https://darrengwon.tistory.com/620
firebase_auth 를 활용한 로컬 로그인
유저 상태 체크 : onAuthStateChanged auth 상태가 변경되는 것을 감지합니다. 아래와 같이 작성하면, 유저가 로그인 했을 때는 MainPage()를 안 했을 때는 AuthPage()를 보여줍니다. home: StreamBuilder ( strea..
darrengwon.tistory.com
새로 글을 썼습니다.
당연히 firebase_auth와 firebase_core를 설치한 이후에 이용할 수 있습니다.
flutterfire의 경로 (https://github.com/FirebaseExtended/flutterfire)에 가서 하나씩 설치해봅시다.
FirebaseExtended/flutterfire
🔥 Firebase plugins for Flutter apps. Contribute to FirebaseExtended/flutterfire development by creating an account on GitHub.
github.com
우선 이메일을 활용한 회원가입을 할 예정이니 firebase에서 다음을 활성화해줍시다.
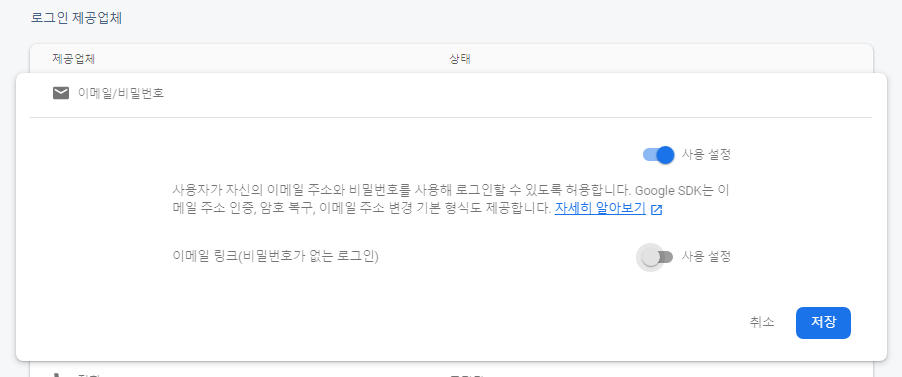
회원가입: createUserWithEmailAndPassword
말 그대로 이메일과 비밀번호를 통해 유저를 생성합니다.
TextField에서 입력값을 받고, 등록을 누르면 입력한 값을 적절히 처리해주면 된다.
디테일한 처리는, 비밀 번호는 validation을 위해 두 개의 값을 받아서 처리하고 보여지는 값의 keyboardType을 visiblePassword로 등록하자. 정식 비밀번호는 obscureText값을 true로 주어서 보이지 않게 가리자.
일단 여기선 로직을 살펴보기 위해 비밀번호를 하나만 받았다. 일반적으로, 가입 시에는 비밀번호 확인을 하나 더 받고 form validation을 먼저 진행한 후에 유저 가입 절차를 시작한다.
String password;

// TextField에서 입력값을 받고
TextField(
  obscureText: true, // 이 값을 통해 입력한 값이 *로 가려지게 된다.
  style: TextStyle(
    color: Colors.black,
  ),
  onChanged: (value) {
    password = value;
  },
  decoration: kInputDecoration.copyWith(
    hintText: 'password',
    hintStyle: TextStyle(color: Colors.grey)),
),

// Button을 누르면 로직을 처리한다.
Button(
  color: Colors.lightBlueAccent,
  text: '회원가입',
  onPressed: () {
    //Implement login functionality.
    print(email);
    print(password);
  },
),
자, 이제 로직 부분을 하나씩 만들어가보자.
flutterfire의 core와 auth를 설치한 후 import해주자.
(https://pub.dev/packages/firebase_auth#-installing-tab-)
import 'package:firebase_auth/firebase_auth.dart';

... 중략

class _RegistrationScreenState extends State<RegistrationScreen> {

  // 해당 클래스 내부에서만 사용할 수 있도록 _을 붙여줍니다.
  // FirebaseAuth의 인스턴스를 하나 생성합니다.

  final _auth = FirebaseAuth.instance;
  String email;
  String password;

  Button(
  color: Colors.blueAccent,
  text: 'Register',
  // 새 유저를 생성하는 일은 비동기적으로 일어나야 하므로 async를 사용해줍시다.
  onPressed: () async {
    // 비동기 처리는 항상 try/catch로 감싸줍시다.
    try {
      // FirebaseAuth의 인스턴스에는 아주 많은 메서드가 있습니다.
      // 사용시마다 적절한 메서드를 사용해주면 일사천리~
      final newUser = await _auth.createUserWithEmailAndPassword(
        email: email.trim(), password: password
      );

      // 로그인이 성공하면 ChatScrren 으로 날려보냅니다.
      if (newUser != null) {
        Navigator.pushNamed(context, ChatScreen.id);
      }

    } catch (e) {
      print('fail to create newUser');
    }
  },
),
유저 정보 표시: currentUser
유저 생성이 완료되면 ChatScreen으로 바로 이동시키는 것으로 처리했습니다. 이 경우 ChatScreen에서 가입한 유저의 정보를 표시해야 해보겠습니다.
만약 위에서 가입이 성공적으로 이루어져서 newUser가 null이 아니라면, FirebaseAuth.instance의 currentUser 메서드 내부에 유저 정보가 담겨있습니다.
이를 이용해 새로운 페이지에서 다음과 같이 loggedInUser에 user 정보를 담아줬습니다.
class _ChatScreenState extends State<ChatScreen> {
  final _auth = FirebaseAuth.instance;
  FirebaseUser loggedInUser;

  void getCurrentUser() async {
    try {

      // currentUser를 가져옵니다.
      final user = await _auth.currentUser();
      if (user != null) {
        loggedInUser = user;
        print(loggedInUser.email);

      }
    } catch (e) {
      print(e);
    }
  }
이제 테스트를 해봅시다. 주의할 점은
- firebase 자체 규칙으로 비밀번호는 최소 6자리 이상이어야 한다는 것.
- email에 PlatformException(ERROR_INVALID_EMAIL, The email address is badly formatted., null) 오류가 난다면 trim을 통해 정리를 해줄것.
- 한 번 로그인한 후에는 PlatformException(ERROR_EMAIL_ALREADY_IN_USE, The email address is already in use by another account., null) 오류가 난다는 것.
회원 등록에 성공하면 토큰을 반환하며 이동에 성공합니다.
D/FirebaseAuth( 3813): Notifying id token listeners about user ( t3...).
D/FirebaseAuth( 3813): Notifying auth state listeners about user ( t3... ).
등록한 유저들은 아래와 같이 Firebase에서 살펴볼 수 있습니다.
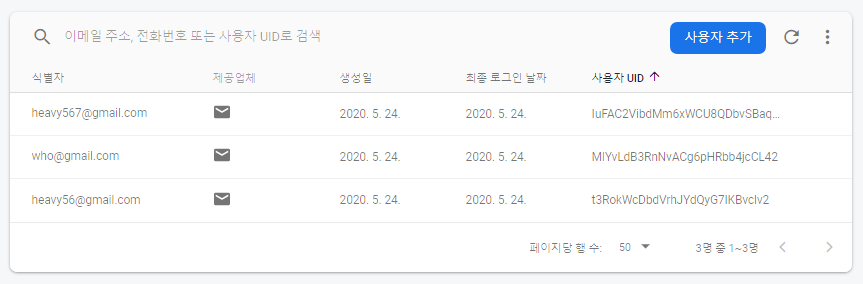
로그인: signInWithEmailAndPassword
이제 해당 목록에 있는 유저 정보를 통해 로그인을 구현해보겠습니다. 이 경우 FirebaseAuth.instance 메서드의 signInWithEmailAndPassword를 통해 구현하면 됩니다.
final _auth = FirebaseAuth.instance;

Button(
  color: Colors.lightBlueAccent,
  text: 'Log In',
  onPressed: () async {
    //Implement login functionality.
     try {
      final user = await _auth.signInWithEmailAndPassword(
          email: email.trim(), password: password);
       if (user != null) {
        Navigator.pushNamed(context, ChatScreen.id);
      }
    } catch (e) {
      print(e);
    }
  },
),
로그아웃: signOut
FirebaseAuth.instance의 메서드인 signOut을 이용하면 쉽게 로그아웃할 수 있습니다.
IconButton(
    icon: Icon(Icons.close),
    onPressed: () {
      //Implement logout functionality
      _auth.signOut();
      Navigator.pushNamed(context, WelcomeScreen.id);
    }),
비동기 처리가 진행될 때의 스피너
추가로, 로그인 / 회원가입의 경우 누르고 바로 이동하는 게 아니라 비동기적 처리를 하기 때문에 잠깐의 지연시간이 있습니다. 이 경우 유저에게 아무 정보도 표시해주지 않으면 유저는 당황할 것입니다.
이 경우 로딩창이나 스피너를 돌리는 게 일반적입니다. 다음 패키지를 추천합니다. 페이지를 감싸고 스피너를 돌리면 됩니다.
(https://pub.dev/packages/modal_progress_hud#-readme-tab-)
modal_progress_hud | Flutter Package
A modal progress indicator widget (HUD = heads-up display). Wrap around another widget to block access to widget during an async call. Also accepts a custom spinner.
pub.dev
bool showSpinner = false;

Widget build(BuildContext context) {
  return Scaffold(
    backgroundColor: Colors.white,
    body: ModalProgressHUD(
      // async를 돌릴 때 해당 값을 true로 설정해주면 됩니다.
      inAsyncCall: showSpinner,
      child: .... 중략

  // 버튼을 눌러 async를 처리할 때 setState를 이용해 showSpinner값을 변경해줍시다.
    Button(
    color: Colors.blueAccent,
    text: 'Register',
    onPressed: () async {
      setState(() {
        showSpinner = true;
      });
      try {
        final newUser = await _auth.createUserWithEmailAndPassword(
            email: email.trim(), password: password);
         if (newUser != null) {
          Navigator.pushNamed(context, ChatScreen.id);
          // 당연히 처리가 끝났으므로 false로 되돌려줍시다.
          setState(() {
            showSpinner = false;
          });
        }
      } catch (e) {
        print(e);
      }
    },
  ),
'📱 Mobile > 🔥 Firebase + Flutterfire' 카테고리의 다른 글
| flutterfire를 활용한 facebook oauth (android) (0) | 2020.07.13 |
|---|---|
| firebase_auth 를 활용한 로컬 로그인 (0) | 2020.07.13 |
| FireStore 활용하기 (0) | 2020.05.24 |
| flutterfire를 활용한 google oauth (0) | 2020.05.24 |
| Firebase (flutterfire) 소개 및 앱 등록 (0) | 2020.05.14 |
