Redux - A predictable state container for JavaScript apps. | Redux
A predictable state container for JavaScript apps.
redux.js.org
🚀 Redux가 뭐야
JS 어플리케이션을 위한 예측 가능한 상태 관리 라이브러리입니다. (A Predictable State Container for JS Apps)
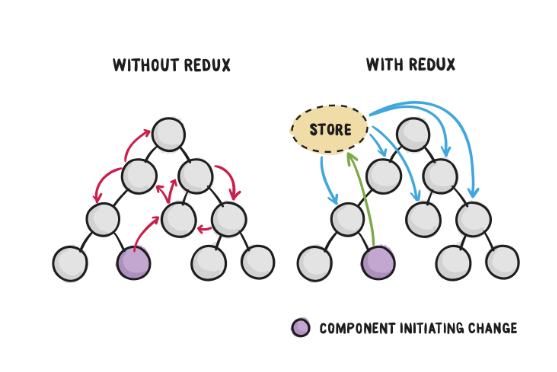
각 컴포넌트에서 다른 컴포넌트로 props, state를 오가며 전달하는 것은 복잡합니다. 외부 store에 state를 한꺼번에 중앙 집중적으로 관리하는 것이 효율적이고, 쉽습니다.
컴포넌트를 예로 들었지만 반드시 React에서만 사용하는 건 아닙니다. Pure하게 사용할 수도 있고, 다른 프레임워크에서 사용할 수도 있습니다. 심지어 Flutter에서도 Redux를 사용할 수 있습니다. 이번 포스트에서는 순수한 JS + Redux를 활용해서 본질에 집중해보겠습니다.
🚀 Redux의 스토리라인
store는 정보가 저장되는 곳입니다. store 안에는 state가 저장됩니다. store에 직접 접속하는 것은 금지되어 있습니다.
store에는 reducer가 반드시 있어야 합니다. 스토어를 생성하는 코드에는 reducer가 꼭 들어갑니다.
const store = Redux.createStore(reducer);
reducer는 state와 action을 받아 적절한 로직을 처리하여 새로운 state를 반환하고, 그 값을 반영하여 새롭게 render를 그리도록 하는 함수입니다. Redux에서 가장 중요한 것이 reducer입니다. 중추적인 역할을 합니다.
const reducer = (state, action) => {

  let newState;
  if (action.type === "changeColor") {
     // immutable하게 원본을 유지하기 위해 깊은 복사
     newState = Object.assign({}, state, { color: action.color });
  }

  return newState
}
이 store의 바깥에 render가 존재합니다. render라는 뜻 그대로, UI를 만들어주는 기능을 합니다. 따로 함수가 있는게 아니라 유저가 코딩한 겁니다.
한편, store에 직접 접속하는 것은 금지되어 있습니다. store의 state를 다루기 위해서는 dispatch, subscribe, getState를 이용해야만 합니다.
* 액션의 예시. 참고로, 액션은 함수 형태로도 주어질 수 있습니다.
export const userLogin = (text) => {
  return {
    type: LOGIN_SUCCESS,
    data: {
      ...text,
    },
  };
};
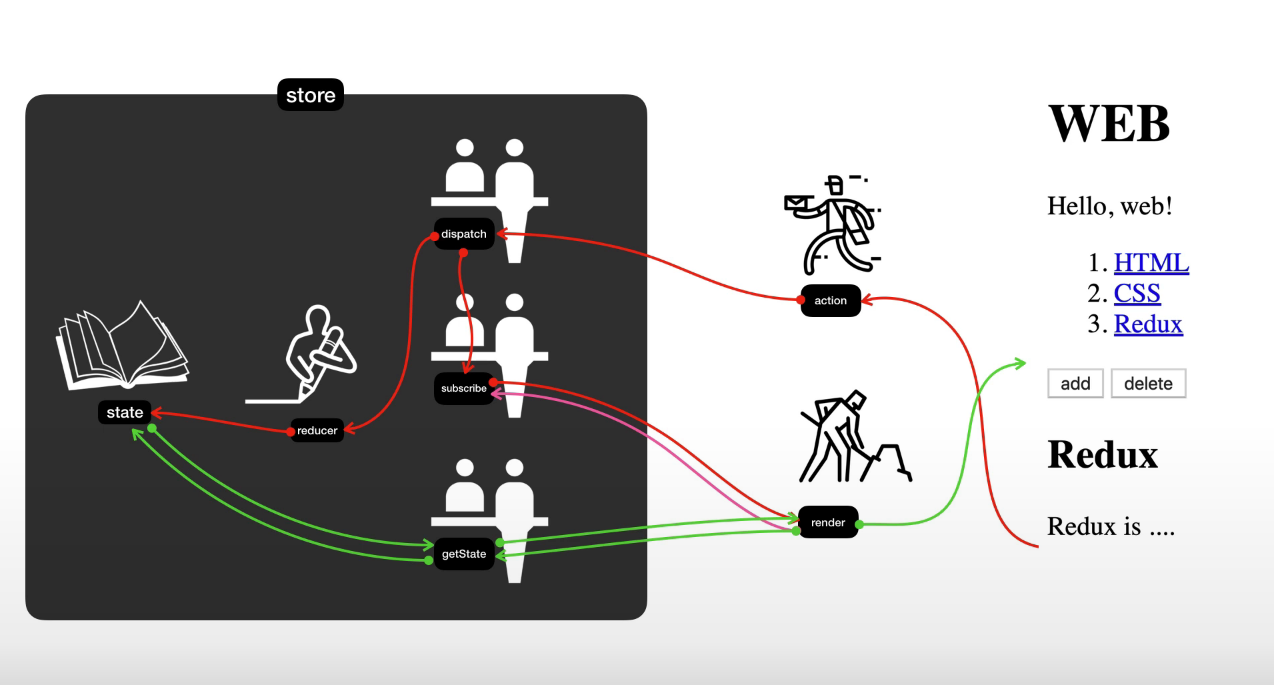
웹 브라우저 상 어떤 action이 취해지면 dispatch에 전달됩니다. (dispatch의 영단어 뜻을 생각해보면 이해하기 쉽습니다.) dispatch는 reducer를 호출하면서 두 값(현재 state와 action) 을 전달합니다. reducer는 state와, action을 참조해서 새로운 state값을 리턴해줍니다. state값이 바뀌면 dispatch는 subscribe에 등록된 render를 호출합니다. 호출된 render는 getState를 통해 새롭게 갱신된 state를 가져와 브라우저 상에 UI를 그립니다.
// dispatch 내부 인자는 action입니다.
store.dispatch({type: 'change', color: 'white', number: 34})
순서대로 나열하자면, action -> dispatch 로직 -> state 변경 -> subscribe를 경유하여 새로운 state를 render 하는 것이 됩니다.
subscribe는 graphQL에서 살펴보았던 그 subscribe와 비슷한 기능을 합니다. render를 subscribe하면 state 변경 때마다 반영합니다. render 함수를 등록해야 이후 state가 변경될 때 실시간으로 UI를 반영하겠죠?
store.subscribe(render)
getState는 단순히 state를 가져오는 것입니다.
function render() {

  const state = store.getState();
  // 로직 처리
}
Redux를 한 문장으로 정리하자면,
action
-> dispatch가 현 state와 action을 가지고 reducer 호출
-> reducer의 로직에 따라 state 변경
-> subscribe에 등록된 render 함수가 변화된 state를 감지하여 UI 업데이트
라고 할 수 있습니다.
🚀 간단한 활용
redux-devtools-extension 사용을 꼭 합시다~!
zalmoxisus/redux-devtools-extension
Redux DevTools extension. Contribute to zalmoxisus/redux-devtools-extension development by creating an account on GitHub.
github.com
devtools를 지금은 저렇게 직접 넣기 보다는 compose와 applymiddlewares 메서드를 이용해 enhancer를 구성한 다음 createStore하고 있습니다.
참고만 합시다.
// reducer를 정의합니다. 파라미터로 state, action을 줘야 합니다.
const reducer = (state, action) => {
  // 맨 처음, state가 없을 때(undefined)
  // 최초 한 번은 무조건 실행되기 때문에 undefined 핸들링이나 초기값 지정이 필요합니다.
  if (state == undefined) {
    return { color: "yellow" };
  }

  // dispatch로 전달된 action의 type에 따라 로직 처리를 합니다.
  let newState;
  if (action.type === "changeColor") {
    // state 값을 직접 바꾸지 말고 깊은 복사를 통해 새 state를 만듭니다.
    // 원본은 immutable하게 유지합시다.
    // 왜? DevTool을 사용하는 이유 중 하나인 state 변화에 따른 시간여행이 가능해지는 조건.
    newState = Object.assign({}, state, { color: action.color });
  }

  // reducer가 반환한 값은 무조건 state가 됩니다.
  return newState;

};

// store를 생성하려면 reducer가 인자로 필요합니다.
// Reduce DevTools를 사용하기 위해 추가적으로 인자를 더해줍니다.
const store = Redux.createStore(reducer,
		  window.__REDUX_DEVTOOLS_EXTENSION__ &&
          window.__REDUX_DEVTOOLS_EXTENSION__());

// store의 값은 getState()를 통해 가져올 수 있습니다.
console.log(store.getState()); // { color: "yellow" } 오브젝트를 반환합니다.


function red() {
  // getState()를 이용해 state를 가져옵니다.
  const state = store.getState();

  // state에서 필요한 속성을 가공해서 활용하면 됩니다.
  document.querySelector("#red").innerHTML = `
    <div class="container" id="component_red" style="background-color: ${state.color}">
        <h1>red</h1>
        <input type="button" value="fire" onclick="
          // 클릭하면 dispatch를 통해 state를 변경합니다.
          // 인자 값은 reducer의 action에 담깁니다.
          store.dispatch({type: 'changeColor', color: 'red'});
        ">
    </div>
`;
}

// state 값이 바뀔 때마다 red 함수를 실행합니다.
store.subscribe(red);

red();
패키지로 설치한 후에 이용하는 게 더욱 깔끔합니다.
npm i redux-devtools-extensionimport { createStore } from "redux";
import { Provider } from "react-redux";
import { composeWithDevTools } from "redux-devtools-extension";
import rootReducer from "./modules";
const store = createStore(rootReducer, composeWithDevTools());
ReactDOM.render(
<Provider store={store}>
<App />
</Provider>,
document.getElementById("root")
);
'State Management > ⚛ Redux' 카테고리의 다른 글
| redux-action으로 액션, 리듀서를 간략히 작성하기 (0) | 2020.07.18 |
|---|---|
| react-redux의 hook : useDispatch, useSelector (0) | 2020.06.27 |
| applyMiddleware, compose를 활용하여 enhancer 만들기 사용하기 (0) | 2020.06.27 |
| React에 Redux, react-redux 적용하기 (0) | 2020.03.25 |
| pure Redux (0) | 2020.03.25 |
