Documentation | NestJS - A progressive Node.js framework
Nest is a framework for building efficient, scalable Node.js server-side applications. It uses progressive JavaScript, is built with TypeScript and combines elements of OOP (Object Oriented Progamming), FP (Functional Programming), and FRP (Functional Reac
docs.nestjs.com
Installation
If using Fastify, instead of installing apollo-server-express, you should install apollo-server-fastify.
yarn add @nestjs/graphql graphql-tools graphql apollo-server-express
overview
code first, schema first 두 가지 방식이 존재합니다.
Nest offers two ways of building GraphQL applications, the code first and the schema first methods.
In the code first approach, you use decorators and TypeScript classes to generate the corresponding GraphQL schema. This approach is useful if you prefer to work exclusively with TypeScript and avoid context switching between language syntaxes.
In the schema first approach, the source of truth is GraphQL SDL (Schema Definition Language) files. SDL is a language-agnostic way to share schema files between different platforms. Nest automatically generates your TypeScript definitions (using either classes or interfaces) based on the GraphQL schemas to reduce the need to write redundant boilerplate code.
편한 걸로 선택하면 됩니다.
code first는 typescript로 클래스를 짜면 해당 클래스에 해당하는 graphql schema를 만들어 줍니다.
반면 schema first는 graphql schema를 먼저 짠후 typescript 클래스나 인터페이스를 생성해줍니다.
Getting started with GraphQL & TypeScript
설치 항목에서도 알 수 있듯, apollo-server를 기반으로 작동합니다.
최상위 모듈인 appModule 부분에서 GrarphQLModules.forRoot를 import하고 세팅을 완료합시다. 여기 옵션에 들어갈 수 있는 항목들은 apollo server 공식 문서에서 확인할 수 있습니다.
www.apollographql.com/docs/apollo-server/api/apollo-server/#constructor-options-lt-ApolloServer-gt
물론 wrapping한 것이므로 이 속성 외에 따로 nest에서 입힌 속성도 존재합니다.
import { Module } from '@nestjs/common';
import { GraphQLModule } from '@nestjs/graphql';
import { join } from 'path';

@Module({
  imports: [
    GraphQLModule.forRoot({
      ...settingOptions
    }),
  ],
  controllers: [],
  providers: [],
})
export class AppModule {}
여기서 code first 방식을 택할 것인지, schema first를 선택할 것인지 분기가 나뉩니다. 저는 typescript에 좀 더 익숙한 편이므로 code first 방식으로 설명하겠습니다.
Code first
To use the code first approach, start by adding the autoSchemaFile property to the options object:
GraphQLModule.forRoot({
  autoSchemaFile: join(process.cwd(), 'src/schema.gql'),
}),
autoSchemaFile은 자동으로 생성한 스키마를 어디에 저장할 것인가를 결정합니다. process.cwd()가 현재 경로를 반환하니까 현재 경로/src/schema.gql에 자동 생성된 스키마를 저장하라는 것입니다.
만약 특정 파일이 아니라 메모리에 생성하고 싶다면 특정 경로가 아닌 true를 입력해주면 됩니다.
GraphQLModule.forRoot({
  autoSchemaFile: true,
}),
그리고, 만약 여러분들이 schema는 모듈에서 정의된 순서대로 쌓이는데, 만약 알파벳 순서대로 정렬하고 싶다면 sortSchma를 true로 두면 알아서 sort 해줍니다.
GraphQLModule.forRoot({
  autoSchemaFile: join(process.cwd(), 'src/schema.gql'),
  sortSchema: true,
}),
A fully working code first sample is available here.
실제로 작성해보도록하겠습니다.
nest g mo restaurants // 아무 모듈이나 생성
restaurants/restaurants.resolvers.ts 생성 후resolver를 작성해주었습니다. @nestjs/graphql에서 제공하는 데코레이션인 Resolver와 Query를 이용합시다.
import { Query, Resolver } from '@nestjs/graphql';

@Resolver()
export class RestaurantResolver {
  @Query(() => Boolean) // 반환해야 하는 값을 함수의 return값으로 해주면 됨
  isPizzaGood(): boolean {
    return true;
  }
}
resolver를 restaurant 모듈의 provider로 제공해줍시다.
import { Module } from '@nestjs/common';
import { RestaurantResolver } from './restaurants.resolvers';

@Module({
  providers: [RestaurantResolver],
})
export class RestaurantsModule {}
모듈을 최상위 모듈인 appModule에 부착해줍시다.
import { Module } from '@nestjs/common';
import { GraphQLModule } from '@nestjs/graphql';
import { RestaurantsModule } from './restaurants/restaurants.module';

@Module({
  imports: [
    GraphQLModule.forRoot({
      autoSchemaFile: true, // in memory
      debug: true,
      playground: true,
    }),
    RestaurantsModule,
  ],
  controllers: [],
  providers: [],
})

export class AppModule {}
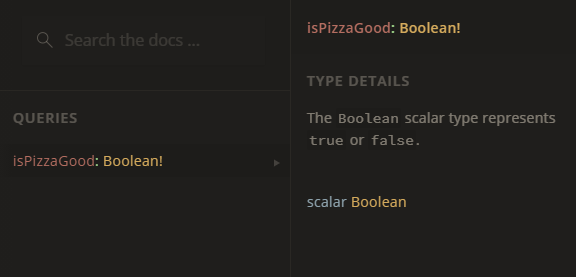
이제 nest를 가동하면, 자동으로 autoSchemaFile에 지정한 경로로 gql을 생성한 것을 확인할 수 있습니다.
더 나아가 http://localhost:[지정한포트]/graphql 로 접속해보시면 작성한 Query 등을 확인해보실 수 있습니다.


아래와 같이 schema.gql이 생성된 것을 확인하실 수 있습니다.
# ------------------------------------------------------
# THIS FILE WAS AUTOMATICALLY GENERATED (DO NOT MODIFY)
# ------------------------------------------------------

type Restaurant {
  id: Float!
  name: String!
  isVegan: Boolean!
  address: String!
  ownersName: String!
  categoryName: String!
}

type Query {
  restaurants(veganOnly: Boolean!): [Restaurant!]!
}

type Mutation {
  createRestaurant(name: String!, address: String!, ownersName: String!, isVegan: Boolean!): Boolean!
}
'Node, Nest, Deno > 🦁 Nest - Series' 카테고리의 다른 글
| Nest + gql + typeORM(@nestjs/typeorm) (3) Repository pattern, @InjectRepository (0) | 2020.11.21 |
|---|---|
| Nest + gql + typeORM(@nestjs/typeorm) (2) entity와 schema를 한 번에 작성하기 (0) | 2020.11.21 |
| Nest + gql + typeORM(@nestjs/typeorm) (1) settings (0) | 2020.11.21 |
| Nest + graphql (3) : Mutation, @ArgsType 과 Validation (0) | 2020.11.21 |
| Nest + graphql (2) : ObjectType, Resolvers(Query, @Args) (0) | 2020.11.21 |
