Documentation | NestJS - A progressive Node.js framework
Nest is a framework for building efficient, scalable Node.js server-side applications. It uses progressive JavaScript, is built with TypeScript and combines elements of OOP (Object Oriented Progamming), FP (Functional Programming), and FRP (Functional Reac
docs.nestjs.com
Nest (NestJS) is a framework for building efficient, scalable Node.js server-side applications. It uses progressive JavaScript, is built with and fully supports TypeScript (yet still enables developers to code in pure JavaScript) and combines elements of OOP (Object Oriented Programming), FP (Functional Programming), and FRP (Functional Reactive Programming).
Under the hood, Nest makes use of robust HTTP Server frameworks like Express (the default) and optionally can be configured to use Fastify as well!
Nest provides a level of abstraction above these common Node.js frameworks (Express/Fastify), but also exposes their APIs directly to the developer. This gives developers the freedom to use the myriad of third-party modules which are available for the underlying platform.
node는 js 런타임이었던 반면 nest는 express 프레임워크를 활용한 다른 서버 사이드(백엔드) 프레임워크인 셈입니다.
또, TS도 지원한다고 합니다.
왜 nest 씀?
TypeScript를 활용한 서비스개발
당근마켓은 중고거래 서비스를 넘어선 동네 기반의 하이퍼 로컬 플랫폼으로 도약하기 위해 다양한 서비스를 준비하고 있어요. 그리고 다양한 서비스들을 TypeScript를 활용하여 만들고 있어요. Typ
medium.com
발췌했습니다.
1. TypeScript는 정적 타입을 통해 컴파일 타임에 타입 검사를 해서 코드의 안정성을 향상시켜요.
2. NestJS는 아키텍처의 정의도 프레임워크에서 제공하기 때문에 각 개발자들의 아키텍처가 통일되고 개발자들이 서로가 작성한 코드의 구조를 쉽게 파악할 수 있어요.
nest 설치 및 nest 프로젝트 시작
우선 globally하게 nestjs/cli를 설치한 후, (이미 설치했다면 패스)
프로젝트를 nest new [project name]으로 생성합니다.
$ npm i -g @nestjs/cli
$ nest new project-name
으음~ 설치 잘 되었습니다.
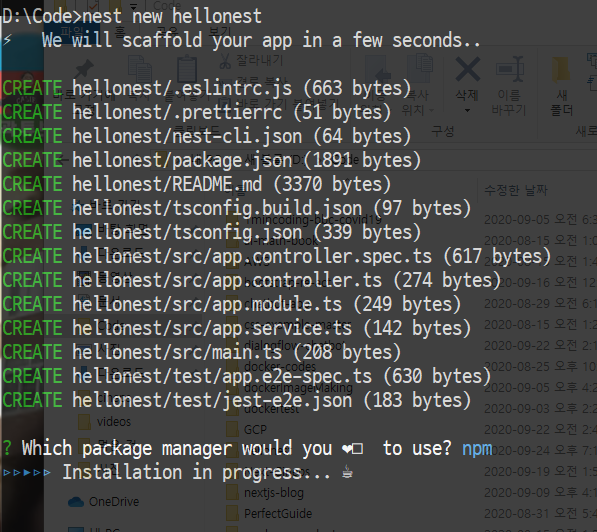
prettier 설정, typescript 설정도 이미 되어 있네요~
이 부분은 원하신다면 커스터마이징하셔도 됩니다.
저는 prettier printWidth랑 tsconfig noImplicitAny 정도만 세팅했습니다.
prettier 설정 : darrengwon.tistory.com/605
tsconfig 설정 : darrengwon.tistory.com/109?category=867626
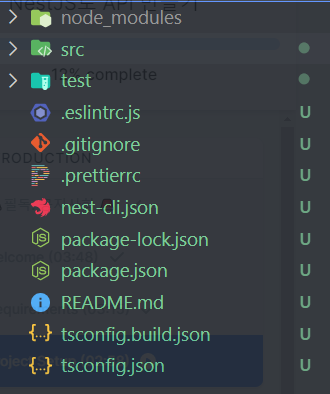
package.json 세팅도 화려하네요 휴
  "scripts": {
    "prebuild": "rimraf dist",
    "build": "nest build",
    "format": "prettier --write \"src/**/*.ts\" \"test/**/*.ts\"",
    "start": "nest start",
    "start:dev": "nest start --watch",
    "start:debug": "nest start --debug --watch",
    "start:prod": "node dist/main",
    "lint": "eslint \"{src,apps,libs,test}/**/*.ts\" --fix",
    "test": "jest",
    "test:watch": "jest --watch",
    "test:cov": "jest --coverage",
    "test:debug": "node --inspect-brk -r tsconfig-paths/register -r ts-node/register node_modules/.bin/jest --runInBand",
    "test:e2e": "jest --config ./test/jest-e2e.json"
  },
우선 개발을 시작해야 하니 npm run start:dev 로 시작하면 3000번 포트로 접근이 가능해집니다. 으음...저는 백엔드는 5000번 포트를 관습적으로 사용하니 main.js에서 바꿔주도록 하겠습니다.
nest CLI
globally하게 nest/cli를 설치한 바가 있습니다.
또, 프로젝트를 cli를 활용하여 nest new [projectName]으로 생성한 적이 있죠.
터미널에 nest를 입력하면 다음과 같은 설명을 볼 수 있습니다.
Usage: nest <command> [options]
Commands:
new|n [options] [name] : Generate Nest application.
build [options] [app] : Build Nest application.
start [options] [app] : Run Nest application.
info|i : Display Nest project details.
update|u [options] : Update Nest dependencies.
add [options] <library> : Adds support for an external library to your project.
generate|g [options] <schematic> [name] [path] : Generate a Nest element.
Available schematics:
┌───────────────┬─────────────┐
│ name │ alias │
│ application │ application │
│ class │ cl │
│ configuration │ config │
│ controller │ co │
│ decorator │ d │
│ filter │ f │
│ gateway │ ga │
│ guard │ gu │
│ interceptor │ in │
│ interface │ interface │
│ middleware │ mi │
│ module │ mo │
│ pipe │ pi │
│ provider │ pr │
│ service │ s │
│ library │ lib │
│ sub-app │ app │
│ resource │ res │
└───────────────┴─────────────┘
여기서 우리는 컨트롤러를 생성하기 위해 g 명령어를 사용할 것입니다.
우리가 처음 생성한 프로젝트는 다음과 같이 생략해서 입력할 수도 있겠군요
nest n [projectName]컨트롤러는 다음과 같이 생성할 수 있겠구요
nest g co [controllerName]
이렇듯, 일일히 폴더를 생성하거나, 파일 명을 지정해주는 수고를 덜 수 있도록 nest 차원에서 커맨드를 제공하고 있으니 활용하시면 됩니다. 굳!
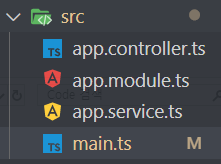
src부터 살펴보자
express에서 MVC 에 따라 폴더를 분리하였듯 Nest는 모듈, 서비스, 컨트롤러, main.ts로 분리한 것을 볼 수 있다.
이러한 분리는 Nest의 독특한 점이 아니라, 견고한 Node 서버를 제작하기 위한 관습이다.
견고한 node.js 프로젝트 설계하기
본 글은 Sam Quinn의 “Bulletproof node.js project architecture” 글을 번역한 것입니다. [Bulletproof node.js project architecture 🛡️ Express.js is great frameworks f
velog.io
main.ts 파일의 이름은 mandatory, 프레임워크가 강제한다.
여기서 AppModule을 NestFactory.create한 바 있습니다. AppModule을 정의한 app.module.ts를 살펴볼까요?
import { NestFactory } from '@nestjs/core';
import { AppModule } from './app.module';

async function bootstrap() {
  const app = await NestFactory.create(AppModule);
  await app.listen(3000);
}
bootstrap();
app.module.ts는 아래와 같이 생겼습니다. 기본적으로 class이고, 위에 @데코레이터를 통해 컨트롤러와 프로바이더를 지정했습니다. 데코레이터는 클래스에 함수 기능을 추가할 수 있게 합니다.
import { Module } from '@nestjs/common';
import { AppController } from './app.controller';
import { AppService } from './app.service';

@Module({
  imports: [],
  controllers: [AppController],
  providers: [AppService],
})
export class AppModule {}
모듈에 지정한 controller는 다음과 같이 생겼습니다. app.controller.ts를 살펴보시면 됩니다. 역시나 클래스이고 데코레이터를 활용했습니다.
import { Controller, Get } from '@nestjs/common';
import { AppService } from './app.service';

@Controller()
export class AppController {
  constructor(private readonly appService: AppService) {}

  @Get()
  getHello(): string {
    return this.appService.getHello();
  }
}
컨트롤러에 활용한 서비스는 app.service.ts에 정의되어 있습니다. 여기에 @Injectable 데코레이터가 붙은 것을 확인할 수 있는데 해당 객체는 런타임에 NestJS에 의해 다른 모듈로 주입될 수 있습니다.
import { Injectable } from '@nestjs/common';

@Injectable()
export class AppService {
  getHello(): string {
    return 'Hello World!';
  }
}
정리하자면, 코드의 흐름은 service(or other provider) + controller => module => main.ts의 순입니다.
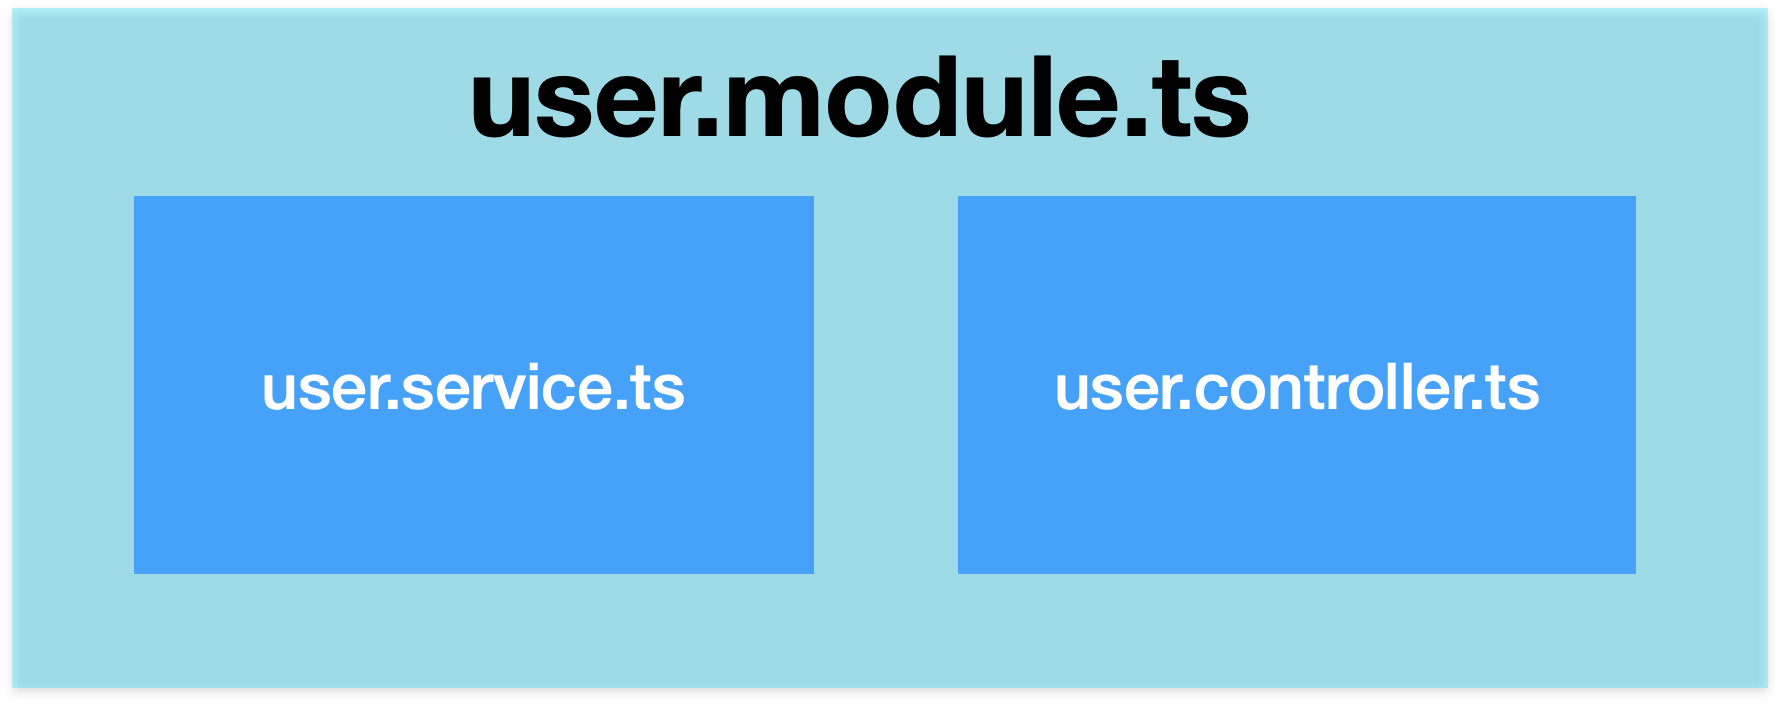
아키텍쳐적으로 보자면 controller와 service를 module로 묶어 한 덩어리로 관리하고 여러 module이 모여 하나의 프로젝트를 구성한다고 보면 되겠습니다. Django 프레임워크에서와 같이 일정한 규칙이 있는 셈입니다.
간단한 정리
Module : controller와 provider(service, repo...)을 응집하는 덩어리. 기능별로 Module을 분리하곤 함.
* AppModule : 모든 Module의 대장 => main.ts에서 app을 구성하는데 사용되고, listen으로 실행됨.
controller : url을 받고 함수를 실행함. 특정 url에 반응하는 함수 로직을 작성할 수는 있지만 보통 그렇게 안함. 그렇다면 이 함수(비즈니스 로직)은 어디서 담당하냐? Service에서.
Service : 비즈니스 로직을 작성함. 그래서 유저에게 제공하는 'Service'라고 이름 붙여짐. nest는 url을 처리하는 controller와 비즈니스 로직을 작성하는 부분을 분리하도록 설계됨
Module
module : 모듈은 비슷한 기능을 하는 코드들의 모음이다. service와 controller를 한 모듈로 묶어 하나의 덩어리를 형성한다. django로 치면 일종의 '앱'이다. photo 앱, user 앱 등등
django도 그러하듯, 세부적인 다른 모듈을 모아 총괄하는 App Module이 있다.
또한 모듈은 다른 모듈과 소통하는 등 자유롭게 사용할 수 있다.

앞서 service와 controller를 한 모듈로 묶는다고 했듯, 실제 코드를 살펴보면 데코레이터를 통해 controller와 provider를 부착하는 모습을 볼 수 있다. provider는 필수는 아니지만 이 정도의 복잡함도 없을거면 왜 Nest함?express로 하지 ㅎ...
import { Module } from '@nestjs/common';
import { AppController } from './app.controller';
import { AppService } from './app.service';

@Module({
  imports: [],
  controllers: [AppController],
  providers: [AppService],
})
export class AppModule {}
Controller 간단히
controller는 node에서 만들었던 그 controller가 맞습니다. 특정 url에 반응하여 어떠한 로직을 수행하는 부분입니다. 정확하게는, 특정 메서드로 특정 url에 접근하면 무슨 로직을 처리해야할지 연결하는 부분입니다. 비즈니스 로직 자체는 Service로 분리합니다. nest는 서비스 로직을 controller로부터 분리하였습니다.
다음 예제를 보면 쉽게, GET /, GET /hello, Post /hello 가 있음을 볼 수 있습니다.
import { Controller, Get, Post } from '@nestjs/common';
import { AppService } from './app.service';

@Controller()
export class AppController {
  constructor(private readonly appService: AppService) {}

  @Get()
  getHello(): string {
    return this.appService.getHello();
  }

  @Get('/hello')
  sayHello(): string {
    return 'hello~ guys';
  }

  @Post('/hello')
  postHello(): string {
    return 'post hello!';
  }
}
그런데 Contoller의 코드를 살펴보면, class의 constructor 부분에 appService를 부여한 것을 보실 수 있습니다. service 부분을 살펴보면 코드는 다음과 같습니다.
import { Injectable } from '@nestjs/common';

@Injectable()
export class AppService {
  getHello(): string {
    return 'Hello World!';
  }
}
Provider 간단히
위 코드에서는 Service가 Provider입니다. 그러나 service만이 provider인 것은 아닙니다. repo, factories, helper, service 등도 provider로 여겨집니다. 이러한 Provider 객체들은 ontrollrer의 특정 로직 부분을 분리하여 작동하고 이를 Controller에서 주입해서 사용됩니다. 그래서 @Injectable 데코레이션을 붙여줘야죠!
정의된 모듈 뿐만 아니라 다른 모듈에서도 import 되어 사용될 수 있습니다. 모듈 안에 Provider객체를 정의하고 등록하면 그 Provider객체는 모듈 안에서 사용될 수 있어요. 뿐만 아니라 서로 다른 모듈을 import해서 그 안에 필요한 Provider객체를 사용할 수도 있어요.
자세한 설명은 아래 공식 문서를 참고해봅시다.
Providers are a fundamental concept in Nest. Many of the basic Nest classes may be treated as a provider – services, repositories, factories, helpers, and so on. The main idea of a provider is that it can inject dependencies; this means objects can create various relationships with each other, and the function of "wiring up" instances of objects can largely be delegated to the Nest runtime system. A provider is simply a class annotated with an @Injectable() decorator.
Documentation | NestJS - A progressive Node.js framework
Nest is a framework for building efficient, scalable Node.js server-side applications. It uses progressive JavaScript, is built with TypeScript and combines elements of OOP (Object Oriented Progamming), FP (Functional Programming), and FRP (Functional Reac
docs.nestjs.com
'Node, Nest, Deno > 🦁 Nest.js' 카테고리의 다른 글
| dotenv 대신 @nestjs/config을 사용해야하는 이유 + 활용 (0) | 2020.11.21 |
|---|---|
| DTO를 통한 검증을 위한 Pipe (Class Validator + mapped-types ...) (0) | 2020.11.19 |
| Module에 대한 이해와 간단한 DI (0) | 2020.09.25 |
| Provider 중 service에 대하여 (0) | 2020.09.25 |
| Controller, @Param, @Body, @Query ... (0) | 2020.09.24 |
