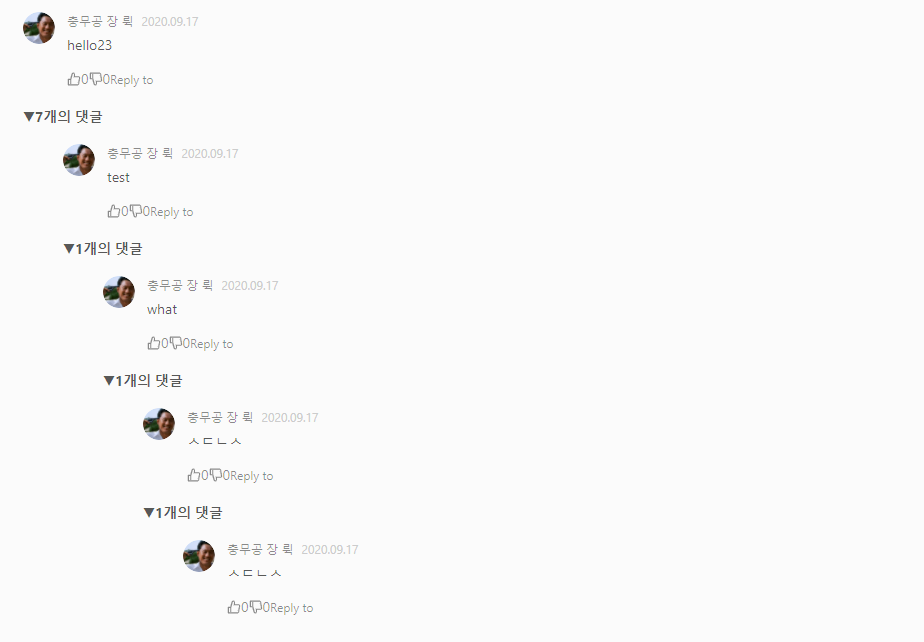
댓글 혹은 대댓글을 작성하면 곧바로 반영되도록 하도록 만들어보겠습니다.
완성된 모습은 아래와 같습니다.

코드가 굉장히 verbose한데 핵심은, 댓글을 쓰고 제출한 후 댓글의 array를 state로 관리하여, state에 변경이 있을 경우 다시 렌더하는 것을 이용하여 실시간으로 자신이 작성한 댓글을 댓글 창에서 볼 수 있도록 하는 것입니다.
Comment Schema입니다. mongoDB로 짰지만 다른 걸로 짜도 됩니다.
const mongoose = require("mongoose");

const commentSchema = mongoose.Schema(
  {
    // 댓글 쓰는 게시물 아이디
    post_id: {
      type: mongoose.Schema.Types.ObjectId,
      ref: "Post",
    },
    // 댓글 쓴 사람
    writer_id: {
      type: mongoose.Schema.Types.ObjectId,
      ref: "User",
    },
    // 댓글 쓴 사람 닉네임
    writer_nickname: String,
    writer_image: String,
    // 댓글의 내용
    contents: {
      type: String,
      maxLength: 1000,
    },
    // 대댓글 구현시 부모 댓글이 무엇인지
    responseTo: {
      type: mongoose.Schema.Types.ObjectId,
      ref: "Comment",
    },
    isDeleted: {
      type: Boolean,
      default: false,
    },
  },
  {
    timestamps: true,
  }
);

const Comment = mongoose.model("Comment", commentSchema);

module.exports = Comment;
저장된 Comment를 SingleComment라는 컴포넌트로 뿌려주었습니다.
- 여기서, Comments와 setComments를 넘겨준 것을 볼 수 있는데, 댓글을 백엔드로 보낸 후 저장에 성공했다면 setComments를 이용하여 Commnets state를 변경하여 새로 렌더를 하는 방식으로 댓글을 확인하도록 하기 위함입니다. 일종의 refresh죠.
- SingleComment와 ReplyComment는 항상 짝으로 같이 움직입니다. 댓글과 대댓글은 동시에 표현되어야 하기 때문이죠
- SingleComment가 실질적으로 댓글을 렌더하는 곳이고, ReplyComent는 재귀적으로 다른 SingleComment를 렌더하기 위한 컴포넌트입니다.
- 여기가 처음 댓글을 뿌리는 최상단입니다. 따라서 responseTo (부모 댓글)이 없는, 그냥 댓글만 렌더해야 합니다. 그 후 ReplyComment에서 responseTo가 있는 대댓글을 렌더하는 방식으로 작성해야 합니다.
- 전의 댓글에 새로 작성한 댓글을 더해야 하는데 2가지 방법이 있습니다. concat을 이용하기, spread operator를 사용하기. 그런데 여기서는 concat을 이용하는 것이 좋습니다. " When working with large arrays, spread will go out of memory and may throw error while concat can handle comparatively larger arrays." 이에 대한 내용은 여기를 참고합시다.
function PostDetail({ Post }) {
  const [commentContents, setcommentContents] = useState("");
  const [Comments, setComments] = useState(Post.comments);

  const textareaChange = (e) => {
    setcommentContents(e.target.value);
  };

  const commentSubmit = (e) => {
    e.preventDefault();

    if (commentContents === "") {
      alert("내용을 입력해주세요");
      return;
    }

    let body = {
      contents: commentContents,
      post_id: Post._id,
      writer_id: userData._id,
      writer_nickname: userData.nickname,
      writer_image: userData.userImage,
    };

    axios.post("/api/comment/save", body).then((res) => {
      if (res.data.commentsaved) {
        setComments(Comments.concat(res.data.comment));
      } else {
        alert("코멘트 저장에 실패했습니다.");
      }
    });
  };

  return (
    <div>

          ... 생략

          {/* 댓글 */}
          {Comments &&
            Comments.map(
              (comment, index) =>
                !comment.responseTo && (
                   <>
                      <SingleComment
                        key={index}
                        post_id={Post._id}
                        comment={comment}
                        userData={userData}
                        Comments={Comments}
                        setComments={setComments}
                      />
                      <ReplayComment />
                    </>)
                )
            )}

          {/* 댓글 다는 곳 */}
          <CommentInput>
            <textarea
              onChange={textareaChange}
              placeholder={"1000자 제한이 있습니다"}
              className="textarea"
            ></textarea>
            <button className="submit" onClick={commentSubmit}>
              댓글달기
            </button>
          </CommentInput>

    </div>
  );
}
SingleComment을 살펴보겠습니다.
- 대댓글을 달기 위해 SingleComment의 내부에 reply 버튼을 누르면 최상단의 input과 동일한 댓글 작성란이 보이도록 만들었습니다.
function SingleComment({ post_id, comment, userData, Comments, setComments }) {
  const [commentContents, setcommentContents] = useState("");
  const [showReplyInput, setshowReplyInput] = useState(false);


  const onReplyClick = () => {
    setshowReplyInput(!showReplyInput);
  };

  const textareaChange = (e) => {
    setcommentContents(e.target.value);
  };

  const commentSubmit = (e) => {
    e.preventDefault();

    if (commentContents === "") {
      alert("내용을 입력해주세요");
      return;
    }

    let body = {
      contents: commentContents,
      post_id: post_id,
      writer_id: userData._id,
      writer_nickname: userData.nickname,
      writer_image: userData.userImage,
      responseTo: comment._id,
    };

    axios.post("/api/comment/save", body).then((res) => {
      // 댓글을 썼으니 댓글창을 닫아야 합니다.
      setshowReplyInput(false);
      if (res.data.commentsaved) {
        setComments(Comments.concat(res.data.comment));
      } else {
        alert("코멘트 저장에 실패했습니다.");
      }
    });
  };


  return (
    <>
      <Comment
        key={comment._id}
        actions={actions}
        author={<a>{comment.writer_nickname}</a>}
        avatar={
          <Avatar src={comment.writer_image} alt={comment.writer_nickname} />
        }
        content={<ContentsWrapper>{comment.contents}</ContentsWrapper>}
        datetime={<DateRefining dateString={comment.createdAt} />}
      />

      // reply 버튼을 누르면 Input이 열리도록 했습니다.
      // 최상단의 Input과 동일합니다.
      {showReplyInput && (
        <CommentInput>
          <textarea
            onChange={textareaChange}
            placeholder={"1000자 제한이 있습니다"}
            className="textarea"
          ></textarea>
          <button className="submit" onClick={commentSubmit}>
            댓글달기
          </button>
        </CommentInput>
      )}
    </>
  );
}

export default SingleComment;
ReplayComment 부분입니다. 여기가 조금 tricky합니다.
- SingleComment와 ReplyComment는 항상 같이 움직이는 것을 염두합시다.
- ReplyComment를 재귀적으로 SingleComment를 돌립니다.
- 아래 코드에 의하면 대댓글의 갯수가 0개를 넘지 않으면 대댓글을 아예 렌더하지 않습니다. 대댓글을 새로 썼을 때 실시간으로 보여주기 위해서(사실 실시간이라기보다는 재렌더링이죠) 전체 댓글 갯수를 세는 로직의 useEffect 부분의 deps에 Comments(전체 댓글)을 넣어주도록 합시다.
import React, { useEffect, useState } from "react";
import SingleComment from "./SingleComment";
import { ViewMore } from "../../styles/Comment";

function ReplayComment({ post_id, comment, userData, Comments, setComments }) {
  const [childCommentNumber, setchildCommentNumber] = useState(0);
  const [openReply, setopenReply] = useState(false);

  const onClickViewMore = () => {
    setopenReply(!openReply);
  };


  // ===============================================
  // 댓글에 몇 개의 대댓글이 있는지 계산하는 로직입니다.
  // ===============================================

  useEffect(() => {
    let commentNumber = 0;
    //  댓글 전체 리스트를 가져온 후 각 댓글의 responseTo가 현제 렌더하는 comment의 _id와 일치하는 갯수
    Comments.map((el) => {
      if (el.responseTo === comment._id) {
        commentNumber++;
      }
    });
    setchildCommentNumber(commentNumber);
  }, [Comments]);


  // ====================================================================
  // 댓글의 아이디(parentId)와 같은 id를 responseTo로 가진 것을 렌더합니다.
  // 대댓글 아래 대댓글이 있을 수 있으므로 SingleComment, ReplyComment를 같이 적어줍시다.
  // ====================================================================

  const RenderReply = (parentId) =>
    Comments.map((comment, index) => (
      <>
        {comment.responseTo === parentId && (
          <div style={{ width: "80%", marginLeft: "40px" }}>
            <SingleComment
              key={index}
              post_id={post_id}
              comment={comment}
              userData={userData}
              Comments={Comments}
              setComments={setComments}
            />
            <ReplayComment
              key={index}
              post_id={post_id}
              comment={comment}
              userData={userData}
              Comments={Comments}
              setComments={setComments}
            />
          </div>
        )}
      </>
    ));

  // ==================================
  // 실질적으로 렌더하는 부분입니다.
  // ==================================
  return (
    <>
      {childCommentNumber > 0 && (
        <ViewMore onClick={onClickViewMore}>
          {openReply ? "▼" : "▶"}
          {childCommentNumber}개의 댓글
        </ViewMore>
      )}
      {openReply && RenderReply(comment._id)}
    </>
  );
}

export default ReplayComment;
'React, Next, Redux > ⚛ React.JS' 카테고리의 다른 글
| react-beautiful-dnd (0) | 2020.12.14 |
|---|---|
| 좋아요/싫어요 구현하기 (0) | 2020.09.17 |
| state의 특성과 setState 함수형 업데이트 (4) | 2020.09.01 |
| React 파일, 컴포넌트 관리를 위한 atomic design (0) | 2020.08.25 |
| dangerouslySetInnerHTML : 문자열로 출력되는 html을 렌더링하기 (0) | 2020.07.26 |
