이번에야말로 CSS Grid를 익혀보자
이 포스트에는 실제 코드가 적용된 부분들이 있으므로, 해당 기능을 잘 지원하는 최신 웹 브라우저로 보시는게 좋습니다. (대충 인터넷 익스플로러로만 안보면 된다는 이야기) 이 튜토리얼은 “차세대 CSS 레이아웃” 시리즈의 두번째 포스트입니다.혹시…
studiomeal.com
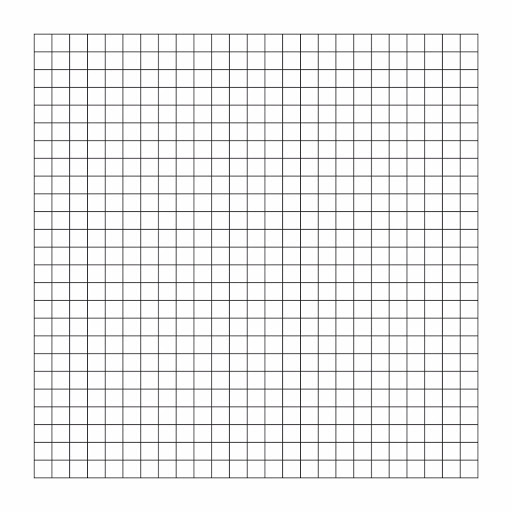
일반적으로 grid, 즉, 격자 무늬라고 하는 것을 상상하면 grid 속성을 이해하기가 쉬워집니다.
전체적인 레이아웃은 Grid로 잡고, 부분 부분에 Flex와 Grid를 적절히 사용해 주는 게 일반적입니다. Grid와 Flex를 조화롭게 활용하는 것이 좋은 레이아웃을 만들어 냅니다.
Flex가 가로(row) 혹은 세로(column)를 기준으로 item들을 정렬한다면 Grid는 가로와 세로를 모두 설정함으로써 격자형(Grid)으로 item을 정렬합니다.
사용 방법은 Flex와 마찬가지로 container와 item으로 이루어지며 문법도 비슷합니다.
<style>
  .grid-container {
    display: grid;
  }
</style>


<body>
  <div class="grid-container">
  <div class="grid-item">A</div>
  <div class="grid-item">B</div>
  <div class="grid-item">C</div>
</body>
🛑 GRID는 기본적으로 item들이 container의 크기에 가득 찹니다. 따라서 height, width값을 적절하게 50vh와 같이 반응형으로 주는 것이 중요합니다.
🛑 일반적으로 행(row)보다 열(column)에 값을 먼저 주는 것이 일반적입니다.
| 컨테이너에 주는 값 | 아이템에 주는 값 |
| grid-template-columns, grid-template-rows row-gap, column-gap, gap grid-auto-columns, grid-auto-rows grid-auto-flow align-items, justify-items max-content, min-content |
grid-column, grid-row align-self, justify-self |
grid container에 주는 값
grid-template-columns, grid-template-rows
이름대로 세로와 가로의 크기를 설정합니다. 예를 들어 grid-template-columns값을 1fr 2fr 1fr로 주었다면 열은 총 3개가 되며 각 크기는 container(wrapper) 내부에서(화면 비율이 아닙니다) 1:2:1의 비율을 유지합니다. 종종 반복적으로 선언하기 위해 repeate 함수를 사용하기도 합니다. 아래 코드와 같이 repeat(3, 1fr)인 경우 1fr 1fr 1fr과 동일하게 적용됩니다.
아래의 경우 열이 3개, 행이 3개인 3행 3열 Grid를 만들었다고 할 수 있습니다.
fr은 fraction의 약자입니다. grid wrapper 내부의 '부분'이라는 의미입니다.
    <style>
      .grid-container {
        display: grid;
        grid-template-columns: repeat(3, 1fr);
        grid-template-rows: 1fr 100px 0.5fr;
        height: 80vh;
      }
🛑 여기서 궁금증은, 2행 3열의 grid를 만들었는데 item이 7개여서 한 item이 붕 떨어지게 될 경우입니다. 이럴 경우 우선 우리가 지정한 요소까지만 영향을 받고 나머지는 auto 값을 받게 됩니다.
grid-template-xxx 내에서 사용할 수 있는 유용함 함수
minmax(값1, 값2)
최소, 최대값을 지정합니다. 다음의 경우 각 아이템의 가로 길이가 100px 최대는 자동으로 늘어나게끔 설정한 것입니다.
grid-template-columns: repeat(8, minmax(100px, 1fr));
auto-fill (repeat 함수에만 쓰입니다)
자동으로 계산하여 fill, 즉, 채웁니다. 아이템이 몇개나 들어올 지 정확하지 않을 때 사용하면 좋습니다.
다음의 경우 최소 너비가 25%이므로 4개가 들어가되 내용물이 많아면 더 적어질수도 있음을 짐작할 수 있습니다. 25%와 같은 픽셀이 아니라 고정값(px)을 주게 된다면 media query를 이용하지 않고도 반응형으로 만들 수 있어 유용합니다.
grid-template-columns: repeat(auto-fill, minmax(25%, auto));

auto-fit (repeat 함수에만 쓰입니다)
이럴 경우 아래와 같이 auto-fit를 적용해주면 부족한 경우에 container를 가득 차게 만들어줍니다. fill과 fit의 스펠링이 비슷하므로 헷갈리지 맙시다.
fit는 이미 있는 아이템을 늘려서 꽉 채워주고, fill은 빈 그리드를 채우는 방식으로 꽉 채웁니다.
grid-template-columns: repeat(auto-fit, minmax(150px, auto));

row-gap, column-gap, gap
기본값으로 gap은 0이지만 위 속성을 통해 gap을 줄 수 있습니다.
.grid-container {
  display: grid;
  grid-template-columns: repeat(3, 1fr);
  row-gap: 1em;
  column-gap: 2em;
  /* gap: 1em row와 column gap을 동시에 줍니다*/
}
grid-auto-columns, grid-auto-rows
말 그대로 auto, 자동으로 배치하는 기능입니다. grid-template-columns, grid-template-rows와 동일하나 몇 개의 아이템이 적용을 받을지 지정하지 않고 자동적으로 이뤄집니다. 아이템의 갯수를 알 수 없거나 유동적일 때 사용합니다.
아래 코드는 모든 아이템의 최소 높이를 100px 최대 높이를 자동으로 설정합니다.
grid-template-columns: repeat(4, 100px);
grid-template-rows: repeat(4, 100px);
auto가 아닌 속성을 사용했더니 주어진 값보다 더 많아질 때 그리드가 깨지는 현상이 일어납니다.
template과 동시에 auto 속성도 같이 주면 주어진 범위를 넘어가는 아이템에 대해서도 속성을 지정할 수 있습니다.
(즉, grid-auto 는 홀로 쓰이기 보다 grid-template와 같이 쓰입니다)
grid-template-columns: repeat(4, 100px);
grid-template-rows: repeat(4, 100px);
grid-auto-columns: 100px;
grid-auto-rows: 100px;
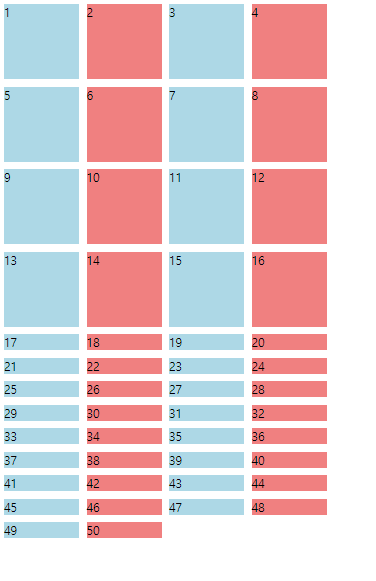

다음과 같은 코드는 1:2의 비율을 반복합니다.
grid-auto-rows: 1fr 2fr;
grid-auto-flow
우리가 설정한 행, 열보다 많은 수의 아이템이 있는 경우, 그리드는 행으로 아이템을 생성합니다.
grid-auto-flow를 column으로 설정하면 column을 기준으로 아이템이 생성됩니다.
.wrapper {
    display: grid;
    gap: 10px;
    height: 50vh;
    grid-template-columns: repeat(4, 100px);
    grid-template-rows: repeat(4, 100px);
    grid-auto-columns: 100px;
    grid-auto-rows: 100px;

    // column으로 생성하게 해보자
    grid-auto-flow: column;
}
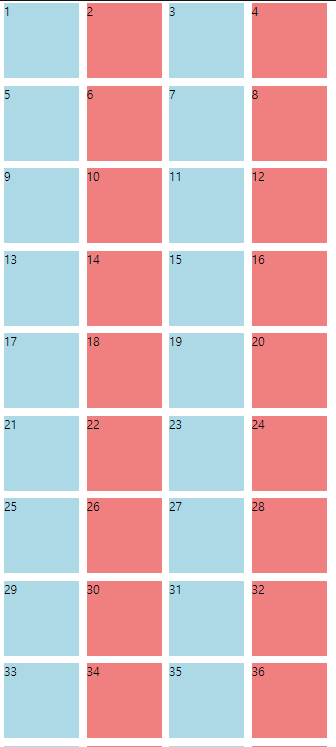

다른 관점에서 grid-auto-flow를 살펴보자.
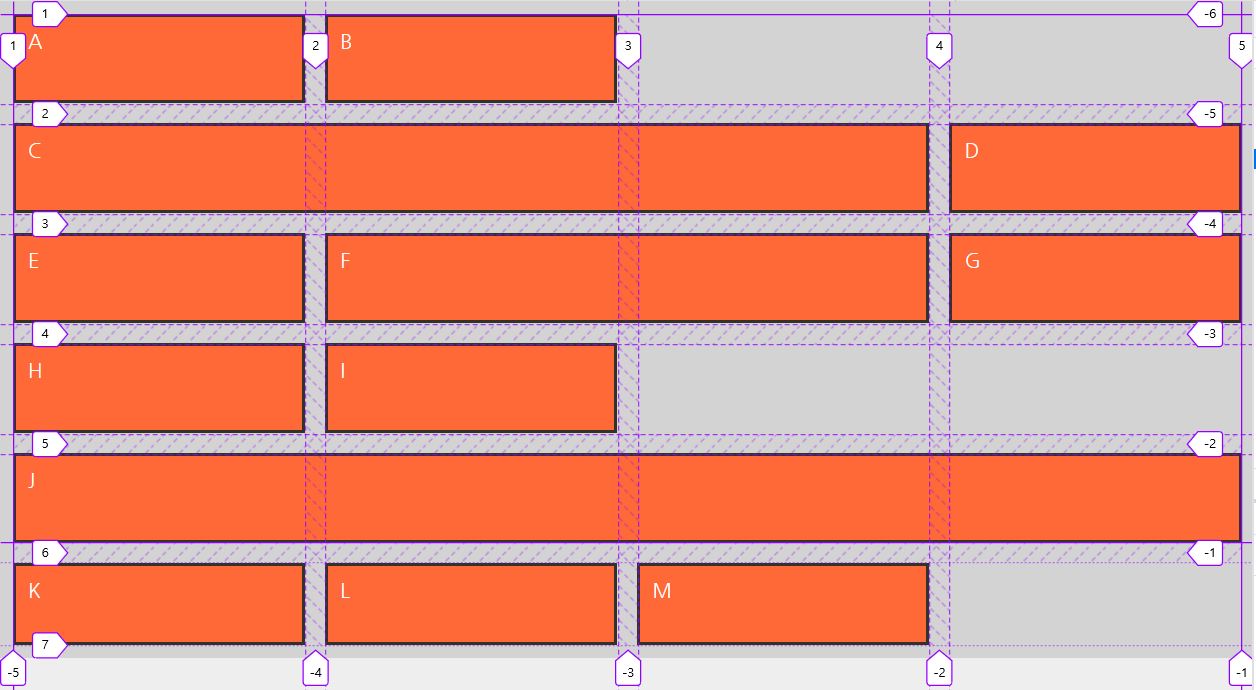
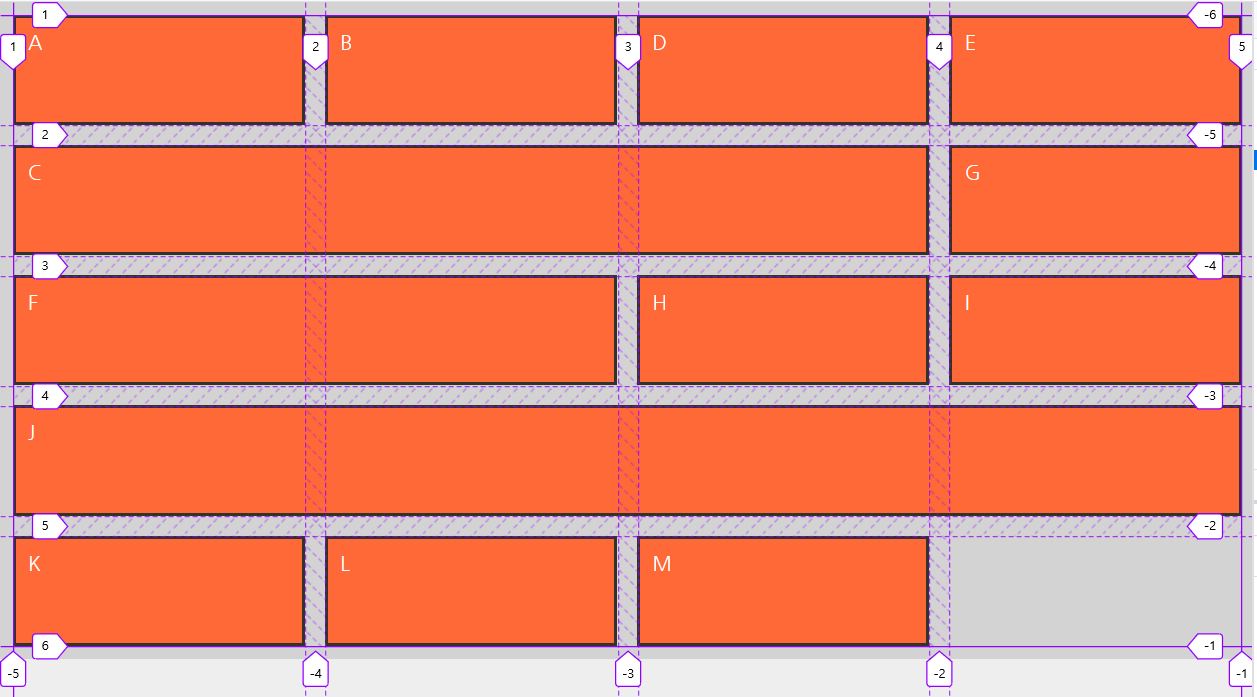
아이템들이 들쭉날쭉하다고 가정해보자. 필연적으로 빈칸이 생길텐데 이 빈칸을 어떻게 다룰 것인지를 grid-auto-flow를 통해 제어할 수 있다. 속성은 row, column, dense, row dense, column dense이 있다. dense는 빈칸을 용납하지 않고 아이템을 꽉꽉 채워 넣는다.
    <style>
      .grid-container {
        display: grid;
        grid-template-columns: repeat(auto-fill, minmax(22%, auto));
        grid-template-rows: repeat(5, minmax(50px, auto));
        height: 70vh;
        gap: 1em;
        grid-auto-flow: row; // row가 기본값(default)입니다
      }
align-items, justify-items
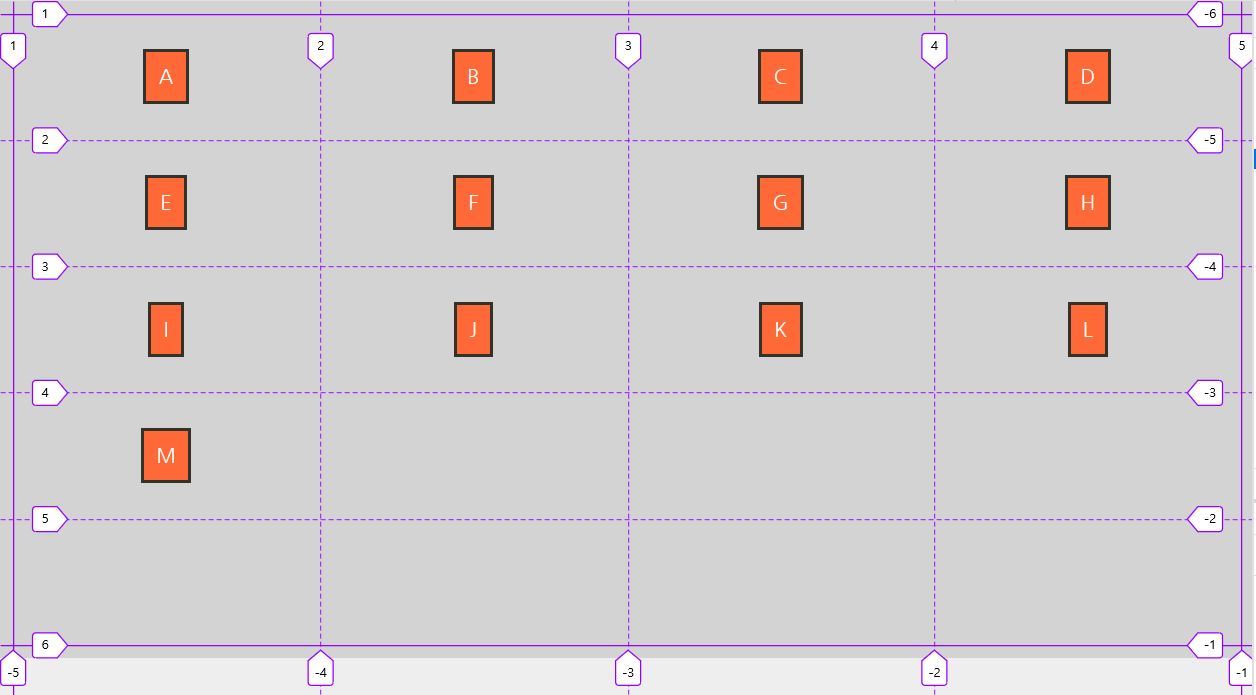
flex에서도 그렇듯, justify-items는 가로, align-items는 세로 정렬이다. 주의할 점은 justify-content는 아이템 전체가 든 셀을 가로 방향으로 조정하는 것이며 align-content또한 아이템 전체가 든 셀을 세로 방향으로 조정하는 것이다. Flex에서는 justify-items가 없었는데 이는 한 방향으로만 설정되기 때문이다.
align-items, justify-items : 셀 내에서의 아이템 움직임
(속성 : stretch start center end)
※ place-items: center flex-start와 같이 동시에 값을 줄수도 있습니다.
※ 기본값은 stretch입니다
align-content, justify-content : 셀 전체(그리드 전체)를 움직임
(속성 : stretch start center end space-between space-around space-evenly)
※ place-content: center flex-start와 같이 동시에 값을 줄수도 있습니다.
    <style>
      .grid-container {
        display: grid;
        grid-template-columns: repeat(auto-fill, minmax(22%, auto));
        grid-template-rows: repeat(5, minmax(50px, auto));
        height: 70vh;
        align-items: center; /* 셀 내에서 세로 center */
        justify-items: flex-end; /* 셀 내에서 가로 flex-end */
        /* place-items: center flex-start 로 한 번에 줄 수도 있습니다. */
      }
    </style>
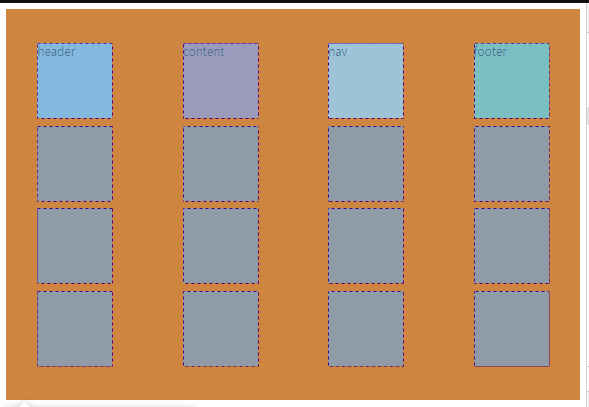
반면 content는 그리드 셀 자체를 움직입니다.
.wrapper {
    display: grid;
    background-color: peru;
    gap: 10px;
    height: 50vh;
    grid-template-columns: repeat(4, 100px);
    grid-template-rows: repeat(4, 100px);
    justify-content: space-around;
    align-content: center;
}
max-content, min-content
max-content는 셀 내용물이 들어갈 수 있는 최대 크기를, min-content는 최소 크기를 반영합니다.
grid-template-columns: max-content min-content;

이 속성은 다른 속성과 결합할 때 효과가 좋습니다.
다음은 최소 크기만큼을 min으로 가지고 최대 1fr 크기를 가지는 열을 작성한 것입니다.
이렇게 되면, 브라우저 크기가 아무리 줄어도 해당 내용물을 해치지 않게 되겠죠.
grid-template-columns: repeat(4, minmax(max-content, 1fr));
grid item에 주는 값
grid-column, grid-row
뭔가 복잡하게 보이지만 grid-column, grid-row는 각각 grid-column(row)-start와 grid-column(row)-end를 동시에 설정하는 축약형이니 이 두 속성만 기억하면 됩니다. grid 선을 기준으로 내부 셀을 지정할 수 있습니다.
grid-template-area를 사용하지 않을 경우 grid-column, grid-row를 활용하면 됩니다.
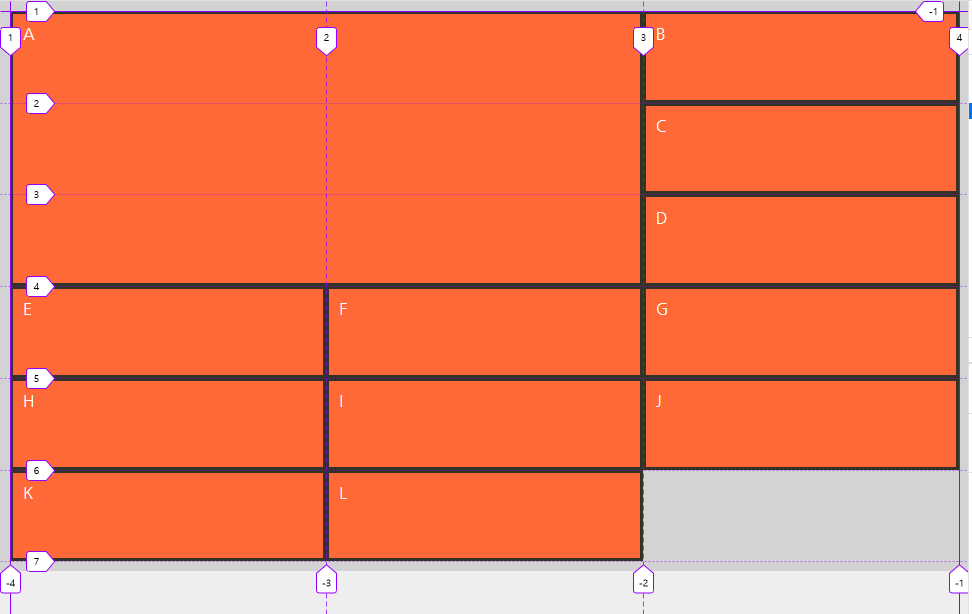
다음과 같은 코드는 이렇게 표현됩니다. 첫번 째 아이템(nth-childe(1))은 세로 1~3 가로 1~4 줄을 차지하게 됩니다. 만약 그냥 1, 2 이렇게 한 개의 줄만 지정한다면 1칸이 할당됩니다.
.grid-item:nth-child(1) {
  grid-column: 1/3;
  grid-row: 1/4;
}
직접 라인의 번호를 명시하는 방법도 있지만 칸 수로 지정하는 방법도 있습니다. 아래 코드는 위 코드와 같은 코드입니다. 편한 방법을 사용합시다.
.grid-item:nth-child(1) {
  grid-column: 1/ span 2; /* 1번 줄로부터 2칸 */
  grid-row: 1/ span 3; /*1번 줄로부터 3칸*/
}
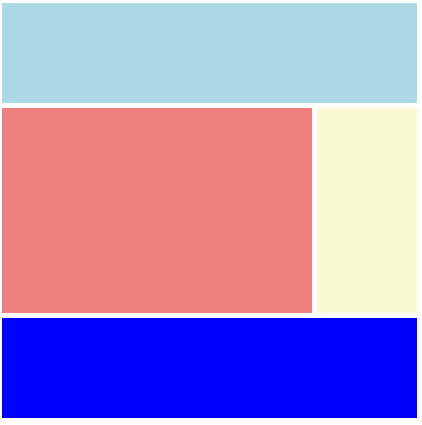
이를 활용하여 다음과 같이 만들 수 있습니다.
-1은 끝까지 라는 의미입니다. 1/-1이면 그리드의 처음부터 끝까지 차지합니다.
.header {
    background-color: lightblue;
    grid-column: 1/ -1;
}

.content {
    background-color: lightcoral;
    grid-column:  1/-2;;
    grid-row: 2/ 4;
}

.nav {
    background-color: lightgoldenrodyellow;
    grid-row: 2/4
}

.footer {
    background-color: blue;
    grid-column: span 4;
}
align-self, justify-self
하나의 셀을 컨트롤 합니다.
.header {
    background-color: lightblue;
    align-self: end;
    justify-self: center;
}
+
grid-template-areas와 grid-area
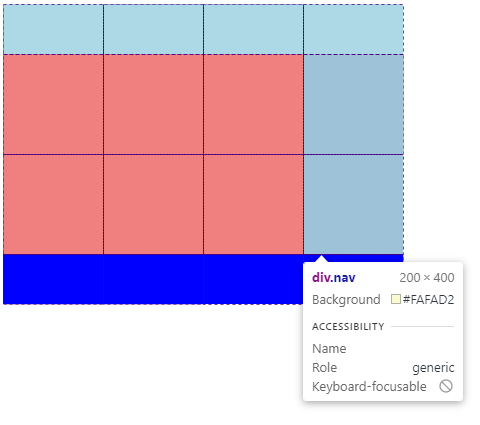
이름을 통해서 그리드를 정렬할 수 있는 속성이다. 컨테이너에 grid-template-areas, 아이템에 grid-area을 줌으로써 활용한다. 참 편리한 방법인데 문제는 IE에서 지원하지 않는다는 것이다. 실례는 다음과 같다.
"header header header header"
"content content content nav"
"content content content nav"
"footer footer footer footer";
우선 template-columns, rows를 통해 4x4 그리드를 만들어 준 다음 적용하면 됩니다.
여기서 클래스 네임은 아무 의미가 없고, grid-area 속성으로 무슨 이름으로 지정할 것인지를 정해야 합니다.
.wrapper {
    display: grid;
    grid-template-columns: repeat(4, 200px);
    grid-template-rows: 100px repeat(2, 200px) 100px;
    grid-template-areas:
        "header header header header"
        "content content content nav"
        "content content content nav"
        "footer footer footer footer";
}

.header {
    background-color: lightblue;
    grid-area: header;
}

.content {
    background-color: lightcoral;
    grid-area: content;
}

.nav {
    background-color: lightgoldenrodyellow;
    grid-area: nav;
}

.footer {
    background-color: blue;
    grid-area: footer;
}
'웹 전반, 브라우저 > SCSS, CSS-flex-grid' 카테고리의 다른 글
| CSS Preprocessor : SCSS (0) | 2020.08.01 |
|---|---|
| grid-template 를 사용해보자 (0) | 2020.08.01 |
| Flexbox 제대로 활용하기 (flex-grow, flex-shrink, flex-wrap etc) (0) | 2020.03.08 |
