www.fastify.io/docs/latest/Getting-Started/
Getting Started
Fast and low overhead web framework, for Node.js
www.fastify.io
왜 fastify를 사용하려고 하는가
node 기반 웹 프레임워크인 fastify는 다음과 같은 장점을 내세우고 있다.
필자는 단순히 express보다 빠르기에 사용해보려고 한다. 게다가 type declaration이 되어 있다는 것도 매력적이었고, Nest.js와 곁들여 사용할 수도 있어서 배우지 않을 이유가 없었다.
그리고 조금 Express에 지친 것도 있다. 이제 그마안...
- Highly performant: as far as we know, Fastify is one of the fastest web frameworks in town, depending on the code complexity we can serve up to 30 thousand requests per second.
- Extendible: Fastify is fully extensible via its hooks, plugins and decorators.
- Schema based: even if it is not mandatory we recommend to use JSON Schema to validate your routes and serialize your outputs, internally Fastify compiles the schema in a highly performant function.
- Logging: logs are extremely important but are costly; we chose the best logger to almost remove this cost, Pino!
- Developer friendly: the framework is built to be very expressive and to help developers in their daily use, without sacrificing performance and security.
- TypeScript ready: we work hard to maintain a TypeScript type declaration file so we can support the growing TypeScript community.
fastify 공식 홈페이지에서 제공하는 벤치마크입니다.
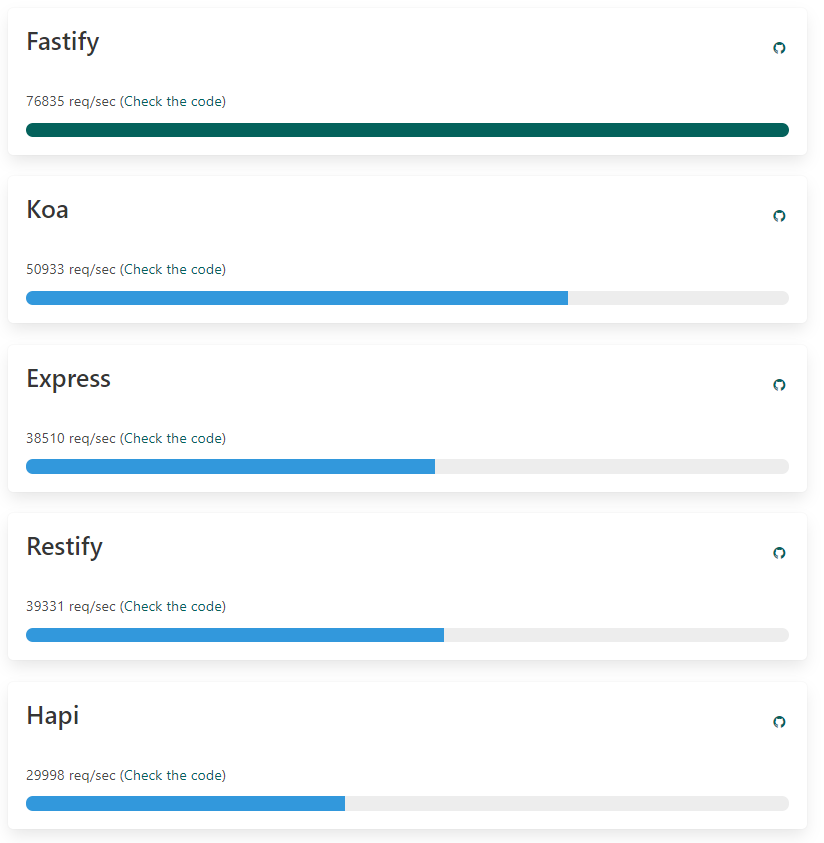
Fastify is around 20% faster than Express in almost every request.
- 출처 : https://medium.com/@onufrienkos/express-vs-fastify-performance-4dd5d73e08e2
설치
yarn add fastify
* TS와 같이 쓰고 싶다면?
Fastify is shipped with a typings file, but you may need to install @types/node, depending on the Node.js version you are using. (솔직히 node LTS 버전 따라가는게 맞다고 생각합니다.)
Your first server
// Require the framework and instantiate it
const fastify = require("fastify")({ logger: true });

// Declare a route
fastify.get('/', async (request, reply) => {
  console.log(Object.keys(req)); // id, context, params, raw, query, log, body
  return { hello: 'world' }
})

// Run the server!
const start = async () => {
  try {
    await fastify.listen(3000);
    fastify.log.info(`server listening on ${fastify.server.address().port}`);
  } catch (err) {
    fastify.log.error(err);
    process.exit(1);
  }
};

start();
* fastify 배포시 주의할 점
The above examples, and subsequent examples in this document, default to listening only on the localhost 127.0.0.1 interface. To listen on all available IPv4 interfaces the example should be modified to listen on 0.0.0.0 like so:
fastify.listen(3000, '0.0.0.0', function (err, address) {
  if (err) {
    fastify.log.error(err)
    process.exit(1)
  }
  fastify.log.info(`server listening on ${address}`)
})
Similarly, specify ::1 to accept only local connections via IPv6. Or specify :: to accept connections on all IPv6 addresses, and, if the operating system supports it, also on all IPv4 addresses.
When deploying to a Docker (or other type of) container using 0.0.0.0 or :: would be the easiest method for exposing the application.
* fastify server instance params
한편, fastify 인스턴스를 생성함에 있어 줄 수 있는 option은 아래와 같은 것들이 있습니다. (타입 정의 부분 확인!)
logger, versioning, bodyLimit (어뷰징 막기 좋은 기능), 각종 timeout, serverFactory, querystringParser, trustProxy 정도가 활용하기에 좋아보입니다. 이 부분은 실제 프로덕트를 만들어 가면서 사용해보기로 합시다.
export type FastifyServerOptions<
  RawServer extends RawServerBase = RawServerDefault,
  Logger extends FastifyLoggerInstance = FastifyLoggerInstance
> = {
  ignoreTrailingSlash?: boolean,
  connectionTimeout?: number,
  keepAliveTimeout?: number,
  pluginTimeout?: number,
  bodyLimit?: number,
  maxParamLength?: number,
  disableRequestLogging?: boolean,
  onProtoPoisoning?: 'error' | 'remove' | 'ignore',
  onConstructorPoisoning?: 'error' | 'remove' | 'ignore',
  logger?: boolean | FastifyLoggerOptions<RawServer> | Logger,
  serverFactory?: FastifyServerFactory<RawServer>,
  caseSensitive?: boolean,
  requestIdHeader?: string,
  requestIdLogLabel?: string;
  genReqId?: <RequestGeneric extends RequestGenericInterface = RequestGenericInterface>(req: FastifyRequest<RequestGeneric, RawServer, RawRequestDefaultExpression<RawServer>>) => string,
  trustProxy?: boolean | string | string[] | number | TrustProxyFunction,
  querystringParser?: (str: string) => { [key: string]: unknown },
  versioning?: {
    storage(): {
      get(version: string): string | null,
      set(version: string, store: Function): void
      del(version: string): void,
      empty(): void
    },
    deriveVersion<Context>(req: Object, ctx?: Context): string // not a fan of using Object here. Also what is Context? Can either of these be better defined?
  },
  return503OnClosing?: boolean,
  ajv?: {
    customOptions?: ajv.Options,
    plugins?: Function[]
  },
  frameworkErrors?: <RequestGeneric extends RequestGenericInterface = RequestGenericInterface>(
    error: FastifyError,
    req: FastifyRequest<RequestGeneric, RawServer, RawRequestDefaultExpression<RawServer>>,
    res: FastifyReply<RawServer, RawRequestDefaultExpression<RawServer>, RawReplyDefaultExpression<RawServer>>
  ) => void,
  rewriteUrl?: (req: RawRequestDefaultExpression<RawServer>) => string,
  schemaErrorFormatter?: (errors: FastifySchemaValidationError[], dataVar: string) => Error
}
Your first plugin
(1) fastify에서는 모든 것이 plugin이다.
with Fastify everything is a plugin.
In this example, we used the register API, which is the core of the Fastify framework. It is the only way to add routes, plugins, et cetera.
그러니까, fastify는 모든 것이 플러그인이고, 그 예시로 라우터를 import해서 다음과 같이 사용할 수 있다는 거네요.
async function myRoute(fastify, options) {
  fastify.get("/", async (request, reply) => {
    return { hello: "guys" };
  });
}

module.exports = myRoute;
// Require the framework and instantiate it

const fastify = require("fastify")({ logger: true });

fastify.register(require("./myRoute"));

// Run the server!
const start = async () => {
  try {
    await fastify.listen(3000);
    fastify.log.info(`server listening on ${fastify.server.address().port}`);
  } catch (err) {
    fastify.log.error(err);
    process.exit(1);
  }
};

start();
(2) DB connection in the plug way
Obviously, the database connection needs to be available before the server is accepting connections.
A typical solution is to use a complex callback, or promises - a system that will mix the framework API with other libraries and the application code.
솔직히 그렇게 'complex' 하지는 않습니다만, express에서 mongoDB connection을 했던 코드를 가져와보겠습니다.
promise를 사용해서 connect한 후에 DB를 연결해야 했습니다.
mongoose
  .connect(dbAddress, {
    useNewUrlParser: true,
    useUnifiedTopology: true,
    useCreateIndex: true,
    useFindAndModify: false,
    dbName: "KinoProject",
  })
  .then(() => console.log(`mongoDB connected`))
  .catch((err) => console.error(err));

// DB가 연결된 후에 listen을 시작해야 한다
app.listen(PORT, () => console.log(`sever on : http://localhost:${PORT}`));
Fastify handles this internally, with minimum effort!
그러니까, 내부적으로 비동기적이게 connection을 할 수 있다는 소리네요.
yarn add fastify-plugin fastify-mongodb
./mongoConnector
async function routes(fastify, options) {
  const collection = fastify.mongo.db.collection("test_collection");

  fastify.get("/", async (request, reply) => {
    return { hello: "world" };
  });

  fastify.get("/animals", async (request, reply) => {
    const result = await collection.find().toArray();
    if (result.length === 0) {
      throw new Error("No documents found");
    }
    return result;
  });
}

module.exports = routes;
./myRoute
const fastifyPlugin = require("fastify-plugin");

async function dbConnector(fastify, options) {
  fastify.register(require("fastify-mongodb"), {
    url: "mongodb://localhost:27017/test_database",
  });
}

// Wrapping a plugin function with fastify-plugin exposes the decorators
// and hooks, declared inside the plugin to the parent scope.
module.exports = fastifyPlugin(dbConnector);
./server.js
const fastify = require("fastify")({ logger: true });

fastify.register(require("./mongoConnector"));
fastify.register(require("./myRoute"));

// Run the server!
const start = async () => {
  try {
    await fastify.listen(3000);
    fastify.log.info(`server listening on ${fastify.server.address().port}`);
  } catch (err) {
    fastify.log.error(err);
    process.exit(1);
  }
};

start();
As you can see, we used register both for the database connector and the registration of the routes.
This is one of the best features of Fastify, it will load your plugins in the same order you declare them, and it will load the next plugin only once the current one has been loaded. In this way, we can register the database connector in the first plugin and use it in the second
Plugin loading starts when you call fastify.listen(), fastify.inject() or fastify.ready()
즉, 선언한 순서대로 plugins이 load되며, 이는 반복적으로 load되는 것이 아니라 서버가 listen, inject, ready 할 때만 불러오게 된다는 거네요.
선언한 순서대로 load된다는 사실은 중요합니다. router에서 mongoDB를 사용하기 때문에 mongo Connector를 먼저 load해야 하는게 당연하죠?
Loading order of your plugins
앞서 언급한대로 선언한 순서대로 load가 됩니다.
fastify는 앱이 정상적으로 작동하기 위해서 다음과 같은 순서대로 선언하기를 권장하고 있습니다.
└── plugins (from the Fastify ecosystem)
└── your plugins (your custom plugins)
└── decorators
└── hooks
└── your services
그리고 여러분들이 Nest.js를 사용해보았다면, 백엔드를 특정 모듈 별로 분리하는 작업을 해보았을 겁니다.
If you want to register a plugin only for a subset of routes, you just have to replicate the below structure.
즉, service를 아래처럼 분리하여서 관리할 수 있다는 거죠.
└── plugins (from the Fastify ecosystem)
└── your plugins (your custom plugins)
└── decorators
└── hooks
└── your services
    │
    └──  service A
    │     └── plugins (from the Fastify ecosystem)
    │     └── your plugins (your custom plugins)
    │     └── decorators
    │     └── hooks
    │     └── your services
    │
    └──  service B
          └── plugins (from the Fastify ecosystem)
          └── your plugins (your custom plugins)
          └── decorators
          └── hooks
          └── your services
Validate your Request data
To validate incoming requests, Fastify uses JSON Schema. Let's look at an example demonstrating validation for routes:
const opts = {
  schema: {
    body: {
      type: 'object',
      properties: {
        someKey: { type: 'string' },
        someOtherKey: { type: 'number' }
      }
    }
  }
}

fastify.post('/', opts, async (request, reply) => {
  return { hello: 'world' }
})
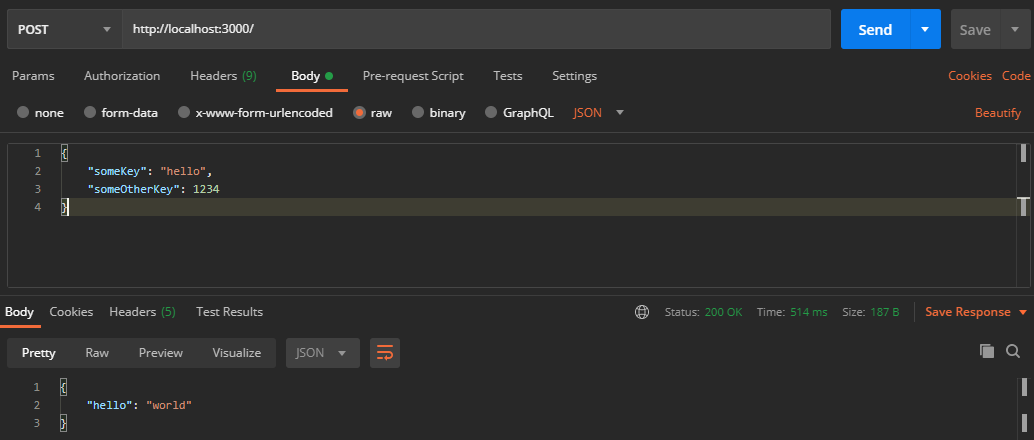
request 중 body를 검증하는 코드입니다.
express에서는 handler 내부에서 따로 Joi 와 같은 툴로 검증했는데, fastify에서는 중간에 검증을 쉽게 진행할 수 있네요.
body에 아무것도 안 보내고 post를 보냈을 때 다음과 같은 응답을 받았습니다.
{
    "statusCode": 400,
    "error": "Bad Request",
    "message": "body should be object"
}
아래와 같이 적절하게 body를 구성해서 요청을 보내면 제대로 된 응답을 받을 수 있습니다.
shema에 주어질 수 있는 값들은 아래와 같습니다.
This example shows how to pass an options object to the route, which accepts a schema key, that contains all of the schemas for route, body, querystring, params and headers.
fastify의 validation에 대한 글은 아래를 참고합시다.
www.fastify.io/docs/latest/Validation-and-Serialization/
Serialize your data
fastify는 JSON 본문을 구문 분석하고 JSON 출력을 Serialize하는 데 매우 최적화되어 있다고 합니다.
JSON Serialization을 빠르게 하기 위해서는 다음과 같이 schema를 제공해주면 된다고 합니다.
To speed up JSON serialization (yes, it is slow!) use the response key of the schema option as shown in the following example:
const opts = {
  schema: {
    response: {
      200: {
        type: "object",
        properties: {
          hello: { type: "string" },
        },
      },
    },
  },
};
 fastify.get("/", opts, async (request, reply) => {
  return { hello: "world" };
});
Simply by specifying a schema as shown, you can speed up serialization by a factor of 2-3. This also helps to protect against leakage of potentially sensitive data, since Fastify will serialize only the data present in the response schema.
예를 들어 아래와 같이, schema에 정의하지 않은 값을 return해도 req에 포함되지 않습니다.
const opts = {
  schema: {
    response: {
      200: {
        type: "object",
        properties: {
          hello: { type: "string" },
        },
      },
    },
  },
};
 fastify.get("/", opts, async (request, reply) => {
  return { hello: "world", password: 112346 };
});
Extend your server
fastify는 미니멀한 프레임워크를 지향하기 때문에 django와 같이 'batteries included"하지 않습니다.
그래서 fastify 에코 시스템에 의존한다고 합니다. 여기서 확인해보세요
- There are 41 core plugins and 122 community plugins
Ecosystem
Fast and low overhead web framework, for Node.js
www.fastify.io
Test your server
테스팅을 내장하고 있지는 않습니다. 아래를 참고합시다.
js니 Jest 사용하면 되겠죠.
www.fastify.io/docs/latest/Testing/
Testing
Fast and low overhead web framework, for Node.js
www.fastify.io
fastify-cli
github.com/fastify/fastify-cli
fastify/fastify-cli
Run a Fastify application with one command! Contribute to fastify/fastify-cli development by creating an account on GitHub.
github.com
  * start                 start a server
  * generate              generate a new project
  * generate-plugin       generate a new plugin project
  * readme                generate a README.md for the plugin
  * print-routes          prints the representation of the internal radix tree used by the router, useful for debugging.
  * version               the current fastify-cli version
  * docs                  starts an interactive terminal session to view the fastify docs for the fastify version installed. navigate with arrow keys
  * help                  help about commands
nodemon 같은거로 돌려도 되긴하는데,
중요한건 fastify 의 entry point를 가동하는데 cli를 사용하는 것이 아니라는 겁니다.
가동할 때는 그냥 평소대로 pm2나 nodemon 등을 사용하시면 됩니다.
You should use the fastify-cli only if you are running a plugin.
Your server.js file is not a plugin, but the entry point of the application.
사용하기 위해서는 globally하게 우선 설치하고, 간단히 사용해봅시다.
$ yarn global add fastify-cli
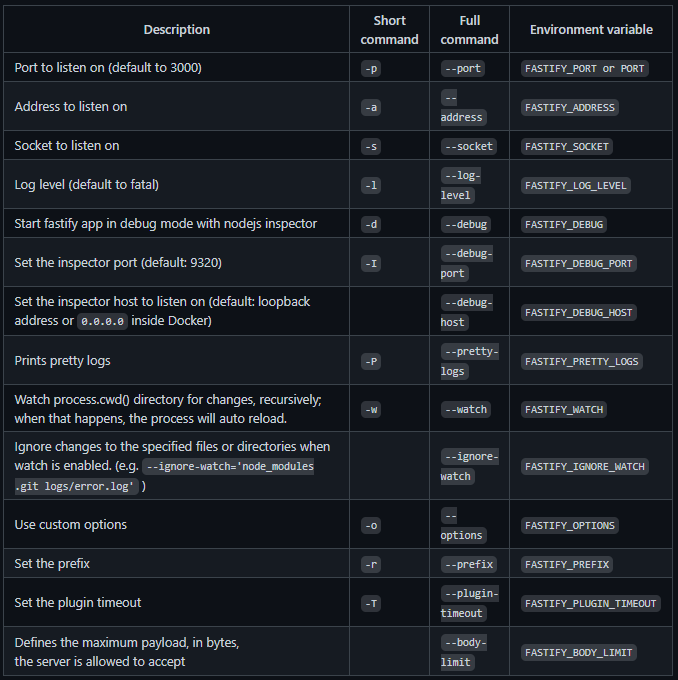
fastify start
Usage: fastify start [opts] <file> [--] [<plugin-options>]DescriptionShort commandFull commandEnvironment variable
fastify generate
fastify generate도 있는데 express generate를 잘 쓰지 않듯, 저도 사용 빈도가 별로 없을 것으로 보입니다.
나중에 프로젝트를 진행해보면서 편한지 알아보아야겠습니다.
fastify version?
fastify의 버전이 아니라 fastify-cli 버전을 출력합니다.
fastify version
Slides and Videos (강의 보면서 slide 쭉쭉 읽으면 꿀잼입니다)
'Node, Nest, Deno > 🐆 fastify' 카테고리의 다른 글
| pino-pretty로 logging 을 가독성 있게! (0) | 2021.01.11 |
|---|
